TL;DR
If you have ever tried to generate a recurring character — a storyboard mascot, a brand spokesperson, an e-commerce fit model — you already know the failure mode: every render is "a person who kind of looks the same," and the differences scream the second you put two frames side by side. The Nano-Banana family on hiapi was tuned for exactly this problem. This post is the workflow I actually use:
- Three Nano-Banana models on hiapi, all of them tagged with character consistency:
Nano-Banana($0.05 flat),Nano-Banana-2($0.085 / $0.076 / $0.114 across 1K / 2K / 4K), andNano-Banana-Pro($0.17 at 1K and 2K, $0.30 at 4K). All three are async tasks behindPOST /v1/tasks. - The technique is a character bible, not a reference image. A dense, repeatable, deterministic description string concatenated as a prefix on every per-scene prompt. No image-to-image, no fine-tune, no LoRA. It survives model upgrades and is trivially versionable in source control.
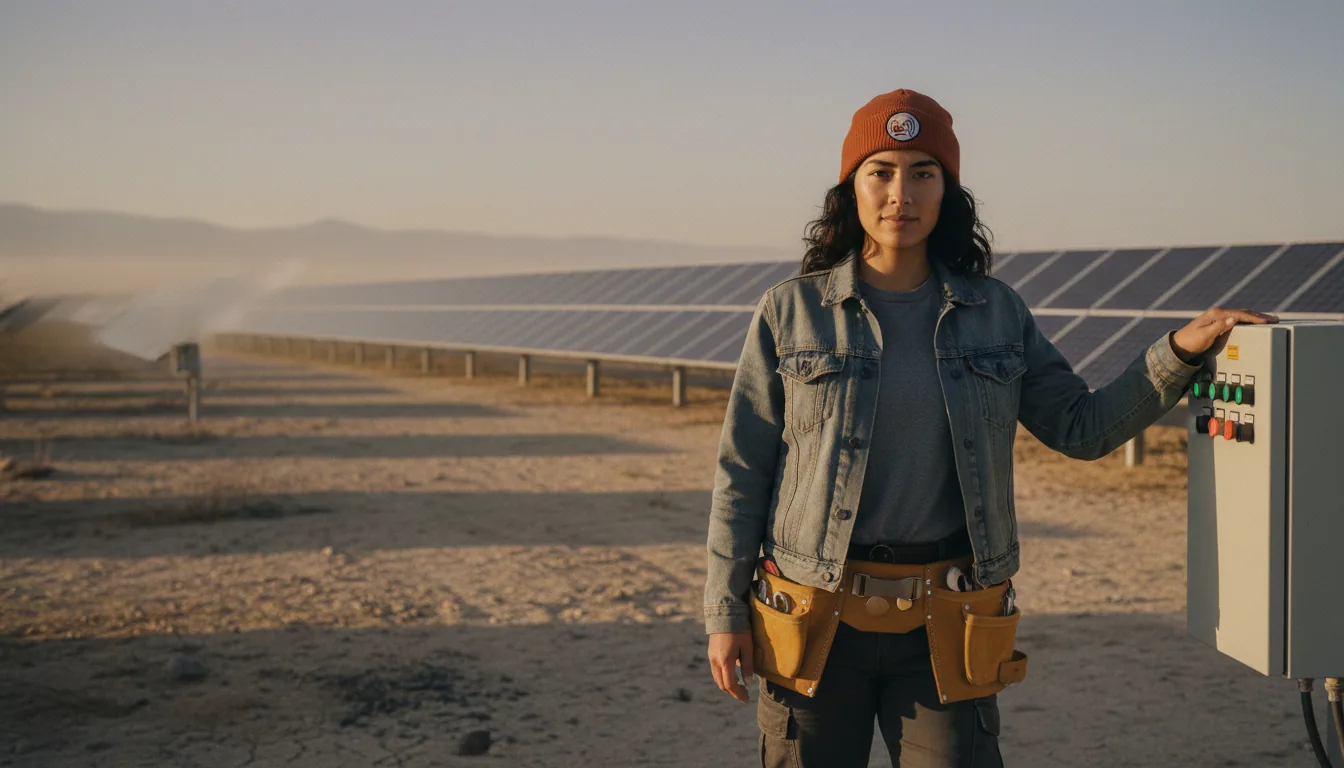
- Two demos in this post, both rendered live through hiapi: a four-image storyboard sequence with one character ("Mira") across very different lighting and locations, and a three-image e-commerce sequence with one model ("Aria") doing a wardrobe swap.
- All seven Nano-Banana renders cost $0.35. One extra Pro-tier render of Mira for side-by-side quality comparison adds $0.17. Total bill for this post: $0.52.
What "character consistency" actually means in practice
Consistency is not a single property — it's a small constellation of properties that have to hold across renders for the result to feel like the same person:
- Face geometry. Eye spacing, nose length, jaw width, cheek volume.
- Skin and hair markers. Tone, freckles or beauty marks, hair colour and texture.
- Wardrobe & accessories. The specific jacket, the specific beanie, the specific toolbelt.
- Vibe. Posture and expression repertoire — the way this character carries themselves.
The Nano-Banana models on hiapi handle #1, #2, and #3 well when the prompt is dense enough. #4 is the bit that you, the author, hold by writing a character bible that includes posture and expression cues, not just appearance.
The three Nano-Banana models on hiapi
Pulled from the live /api/pricing catalogue at the time of writing:
| Model | Resolution tiers | Price (USD per image) | Why pick it |
|---|---|---|---|
Nano-Banana | aspect ratio only, no resolution param | $0.05 flat | Fast iteration. The model you draft the character on. |
Nano-Banana-2 | 1K / 2K / 4K | $0.085 / $0.076 / $0.114 | 4K output, much stronger small-text rendering. The 2K tier is cheaper than 1K — that's not a typo, it's the published policy. |
Nano-Banana-Pro | 1K / 2K / 4K | $0.17 / $0.17 / $0.30 | Sharper detail, deeper micro-features, the most stubborn identity preservation across radical scene changes. |
All three accept input.prompt plus input.aspect_ratio. The Pro and -2 variants additionally accept input.resolution (one of 1K / 2K / 4K). The flat-priced Nano-Banana will reject the resolution field with a 400 — only set it when you've selected one of the tiered models.
My rule of thumb:
- Iterate the bible on
Nano-Bananabecause it's cheap and fast. - Render production batches on
Nano-Banana-2at 2K because the policy makes it the price-quality sweet spot. - Reach for
Nano-Banana-Profor the hero shot — the one frame that ends up on the homepage, the press kit, the printed lookbook.
The character bible technique
A character bible is a single dense paragraph that you concatenate as a prefix on every prompt for that character. It needs to be specific enough that the model has nowhere to roam, but not so prescriptive that you have no room for the scene.
Here is the exact bible I wrote for the storyboard character in this post:
MIRA = (
    "Mira, a 28-year-old field engineer of mixed Filipina–Polish "
    "heritage, warm olive skin, narrow oval face, dark almond eyes "
    "with light crow's-feet, thick straight black eyebrows, a small "
    "mole on the right cheek, shoulder-length wavy black hair tied "
    "loosely behind, rust-orange beanie with a small embroidered "
    "antenna patch, dust-faded denim jacket over a graphite grey "
    "t-shirt, dark cargo trousers, scuffed brown leather work boots, "
    "a battered yellow toolbelt, friendly determined expression. "
    "Cinematic photography, 35mm lens look, natural film grain, "
    "neutral colour grade."
)
Six things this bible does on purpose:
- Names her. "Mira" gives the model a stable handle. Even if the name doesn't surface in the image, having a name in the prompt seems to anchor identity.
- Mixed heritage is explicit, with both halves named. "A woman" or "Asian" is ambiguous. "Filipina–Polish" forces the model to settle on one specific facial blend.
- Eye, brow, hair, skin all individually described. Don't lean on "pretty" or "natural." Spell out the geometry.
- One unique facial mark. The mole on the right cheek. Even if it occasionally moves, having it forces the model into a specific identity space.
- The wardrobe is named, not described loosely. "Rust-orange beanie with a small embroidered antenna patch" is repeatable. "Hat" is not.
- A photographic style stamp at the end. "Cinematic photography, 35mm lens look, natural film grain, neutral colour grade." This keeps the lighting language consistent across scenes that are otherwise very different.
A per-scene prompt is then just: bible + a separator + a short scene paragraph. I use " | Scene: " as the separator. It reads clearly in logs and the model treats the second half as the new request.
Calling the hiapi async task endpoint
All image models on hiapi run through the same async pattern: POST /v1/tasks to create, GET /v1/tasks/{taskId} to poll, and on success read data.output[0].url for the rendered image. The output URL is short-lived (it carries an expireAt), so download the bytes immediately to your storage.
import os, json, subprocess, time

API = "https://api.hiapi.ai/v1/tasks"
TOKEN = os.environ["HIAPI_TOKEN"]


def submit(model: str, prompt: str, aspect_ratio: str,
           resolution: str | None = None) -> str:
    payload = {
        "model": model,
        "input": {"prompt": prompt, "aspect_ratio": aspect_ratio},
    }
    # Only Nano-Banana-Pro and Nano-Banana-2 accept `resolution`.
    # The flat-priced Nano-Banana returns 400 on the extra field.
    if resolution and model in ("Nano-Banana-Pro", "Nano-Banana-2"):
        payload["input"]["resolution"] = resolution

    r = subprocess.run(
        ["curl", "-s", "-X", "POST", API,
         "-H", f"Authorization: Bearer {TOKEN}",
         "-H", "Content-Type: application/json",
         "-d", json.dumps(payload)],
        capture_output=True, text=True, timeout=70,
    )
    data = json.loads(r.stdout)
    return data["data"]["taskId"]


def wait(task_id: str, timeout_s: int = 600) -> str:
    deadline = time.time() + timeout_s
    while time.time() < deadline:
        r = subprocess.run(
            ["curl", "-s", f"{API}/{task_id}",
             "-H", f"Authorization: Bearer {TOKEN}"],
            capture_output=True, text=True, timeout=40,
        )
        task = json.loads(r.stdout)["data"]
        if task["status"] == "success":
            return task["output"][0]["url"]
        if task["status"] == "fail":
            raise RuntimeError(task["error"])
        time.sleep(6)
    raise RuntimeError(f"timeout: {task_id}")


def render(model, scene, ratio, bible, resolution=None):
    prompt = f"{bible} | Scene: {scene}"
    return wait(submit(model, prompt, ratio, resolution))
A 6-second poll interval is the right default for Nano-Banana — a single image lands in roughly 10–60 seconds on a healthy day. Polling tighter than that just wastes round-trips.
Demo A — A four-shot storyboard with one character
The whole point of a storyboard is that the story is what changes between panels — the protagonist is the constant. I'll generate a model sheet and two scene shots, all with the exact same Mira bible.
Step 1 — Visualise the bible
Before you commit a bible to your repo, render a character sheet from it. This is the cheapest way to find out whether the bible is anchored enough.
sheet = render(
    "Nano-Banana", aspect_ratio="3:2", bible=MIRA, scene=(
        "a character model sheet on a clean white studio background, "
        "three views of Mira side by side — three-quarter view facing "
        "left, full profile facing right, three-quarter back view — "
        "same outfit, same hairstyle, same toolbelt, even neutral "
        "studio lighting, no shadows, no text labels."
    ),
)
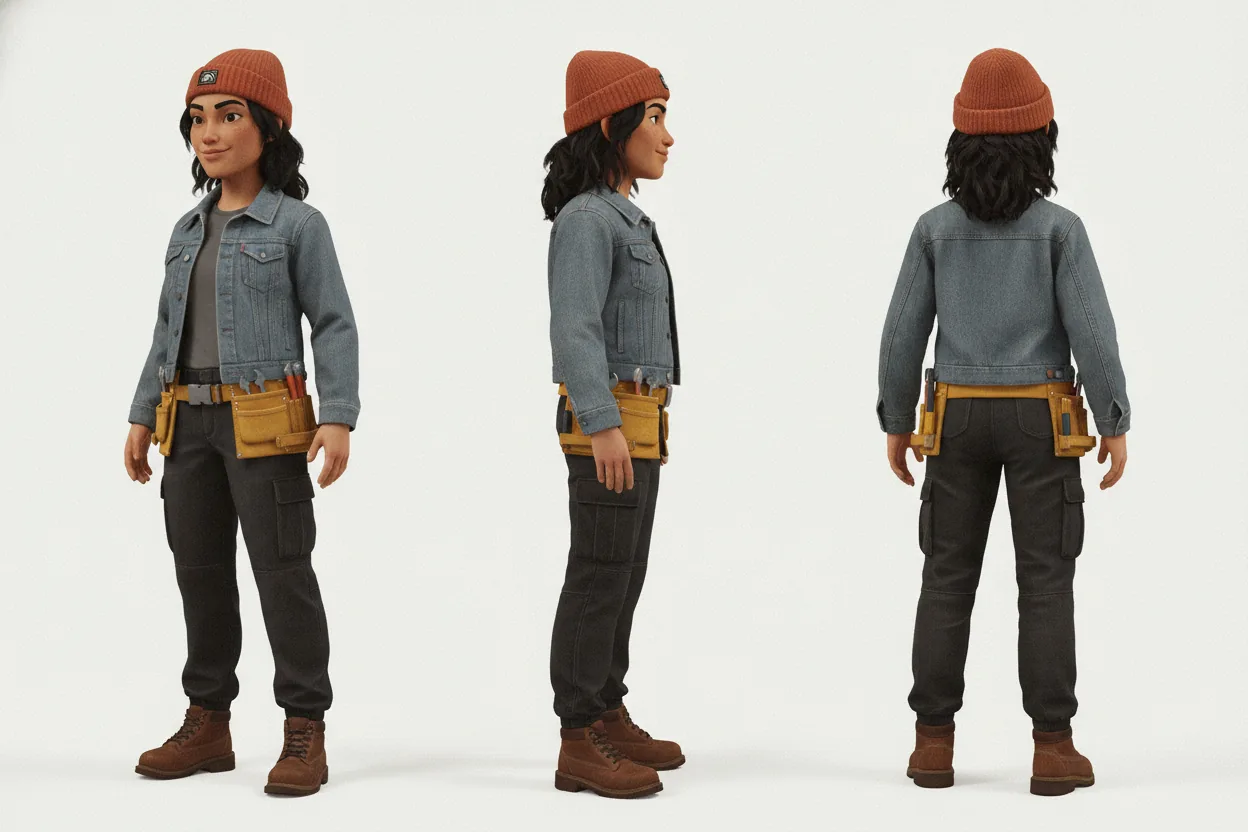
A notable thing happened here: even though the bible explicitly said "Cinematic photography, 35mm lens look," the model produced a 3D toon sheet. That is the single most common failure mode of asking for a "model sheet" or "character sheet" — those tokens drag the aesthetic toward animation industry references in the training set. Two ways to handle it:
- Accept it. The sheet is a reference document for the bible, not part of your published deliverables. The wardrobe, accessories, and rough proportions are visible, which is what you actually need.
- Push back in the scene fragment with
"shot on Kodak Portra 400, full-frame DSLR, no illustration, no toon, no 3D render"— usually enough to drag it back to photoreal.
I went with option 1 here, because the next two scene shots will be the production frames.
Step 2 — Drop the same Mira into two completely different environments
workshop = render("Nano-Banana", "3:2", MIRA, scene=(
    "Mira in a cluttered repair workshop, leaning over a wooden "
    "workbench under a single warm hanging bulb, reading a circuit "
    "schematic on tablet, soldering iron beside her, walls lined "
    "with scavenged parts, late evening, focused expression."
))

rooftop = render("Nano-Banana", "3:2", MIRA, scene=(
    "Mira on a city rooftop in cold overcast morning light, kneeling "
    "to bolt a small antenna mast to a ledge, wind moving her hair, "
    "distant grey buildings, breath barely visible, concentrated "
    "working expression."
))
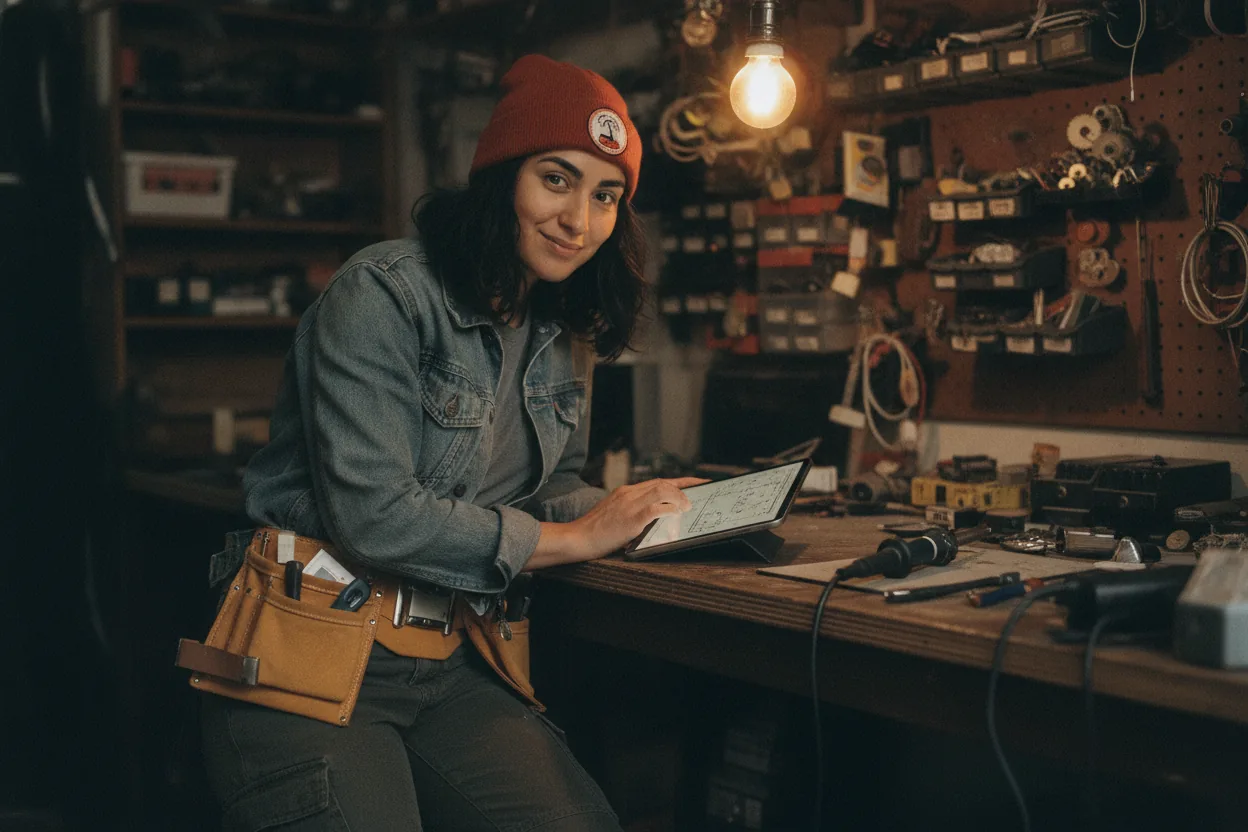
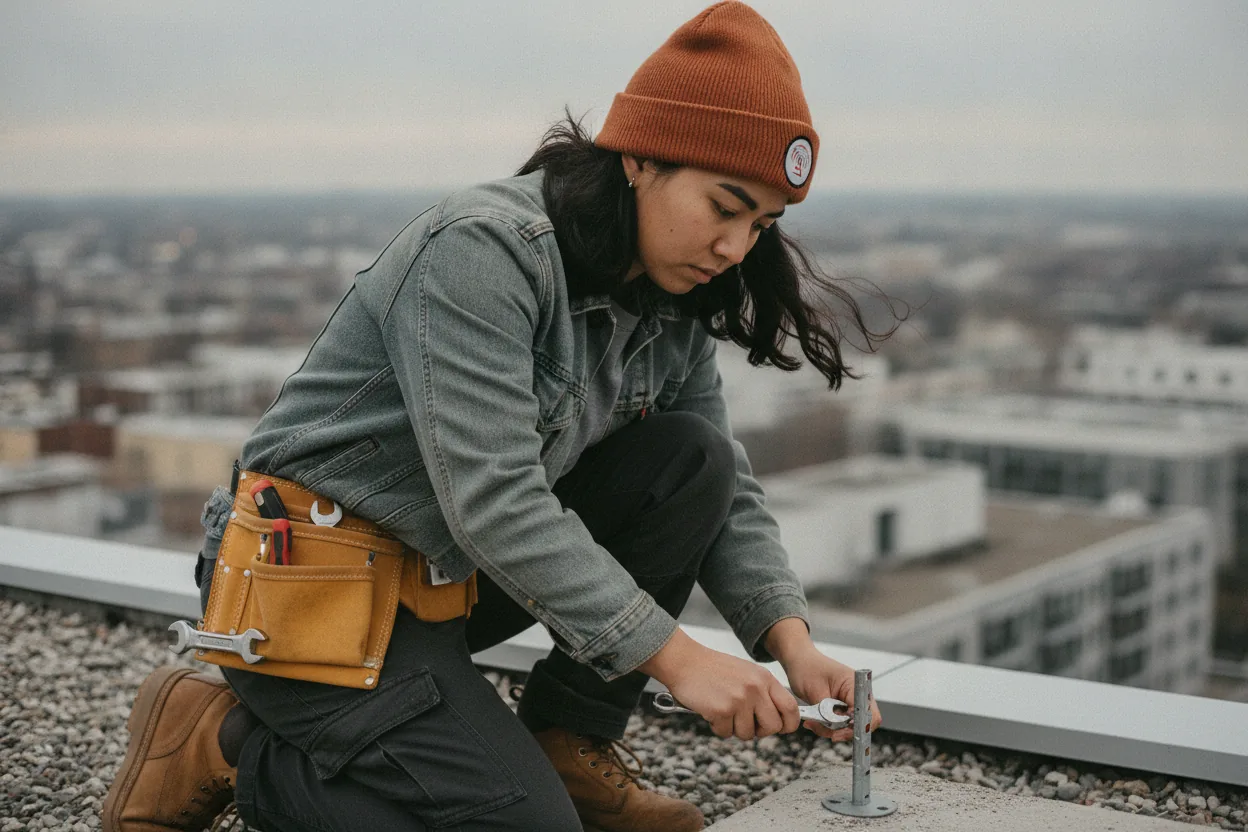
The two scenes have nothing in common environment-wise — warm tungsten light in a cramped indoor space versus cold daylight on an open rooftop. But the rust beanie with the antenna patch is the same, the denim jacket is the same, the toolbelt is the same, and the face reads as the same young woman in both. This is the bible doing its job.
What changed between the scenes (and what didn't)
| Property | Workshop | Rooftop |
|---|---|---|
| Light temperature | warm tungsten | cool overcast |
| Pose | seated, leaning | kneeling |
| Background | cluttered interior | open city rooftop |
| Time of day | late evening | early morning |
| Beanie | ✅ same rust-orange + patch | ✅ same |
| Denim jacket | ✅ same wash | ✅ same |
| Toolbelt | ✅ same yellow leather | ✅ same |
| Face geometry | ✅ same | ✅ same |
| Beauty mark | present on right cheek | present (slightly fainter) |
This last row is the one that matters most. Across two completely different lighting situations, the small mole stayed on the right cheek. That is exactly the consistency signal you want.
Demo B — A three-shot e-commerce sequence with one model
E-commerce is the harder of the two demos in this post. The model has to look literally identical across multiple angles and outfit changes, because the brand's customer is going to A/B these shots in their head on a product detail page. Even small drift breaks the illusion.
Here is the Aria bible:
ARIA = (
    "Aria, a 26-year-old fashion catalogue model of Korean descent, "
    "soft warm undertone skin, oval face with slightly defined "
    "cheekbones, thin straight black eyebrows, dark brown almond "
    "eyes, small natural lips with a faint warm pink, a single "
    "beauty mark just below the left eye, centre-parted glossy "
    "black hair falling straight to mid-back, ears pierced with a "
    "single small gold stud each side, no other jewellery, calm "
    "neutral expression, even soft studio lighting from front-left, "
    "clean light grey seamless paper backdrop, full-body framing, "
    "50mm portrait lens look, neutral colour balance, slight matte "
    "film finish."
)
Three things this bible does that the Mira bible does not:
- It locks the lighting and backdrop. A catalogue model has to live on a clean grey backdrop with flat front-left studio light. By naming both inside the bible, every render starts there.
- It specifies the framing. "Full-body framing, 50mm portrait lens look" gets reproduced consistently across all three shots.
- It nails down the negative space. "No other jewellery" is a small phrase that prevents Nano-Banana from improvising chains or watches into half the renders.
Step 1 — Frontal hero
frontal = render("Nano-Banana", "3:4", ARIA, scene=(
    "full-body straight-on frontal e-commerce shot, Aria standing "
    "relaxed with arms at sides, wearing a structured rust-olive "
    "wool blazer (single-breasted, two buttons, notch lapel, no "
    "pattern) over a plain ivory crew-neck t-shirt and straight-leg "
    "dark indigo denim jeans, simple white leather sneakers, clean "
    "look-book composition."
))
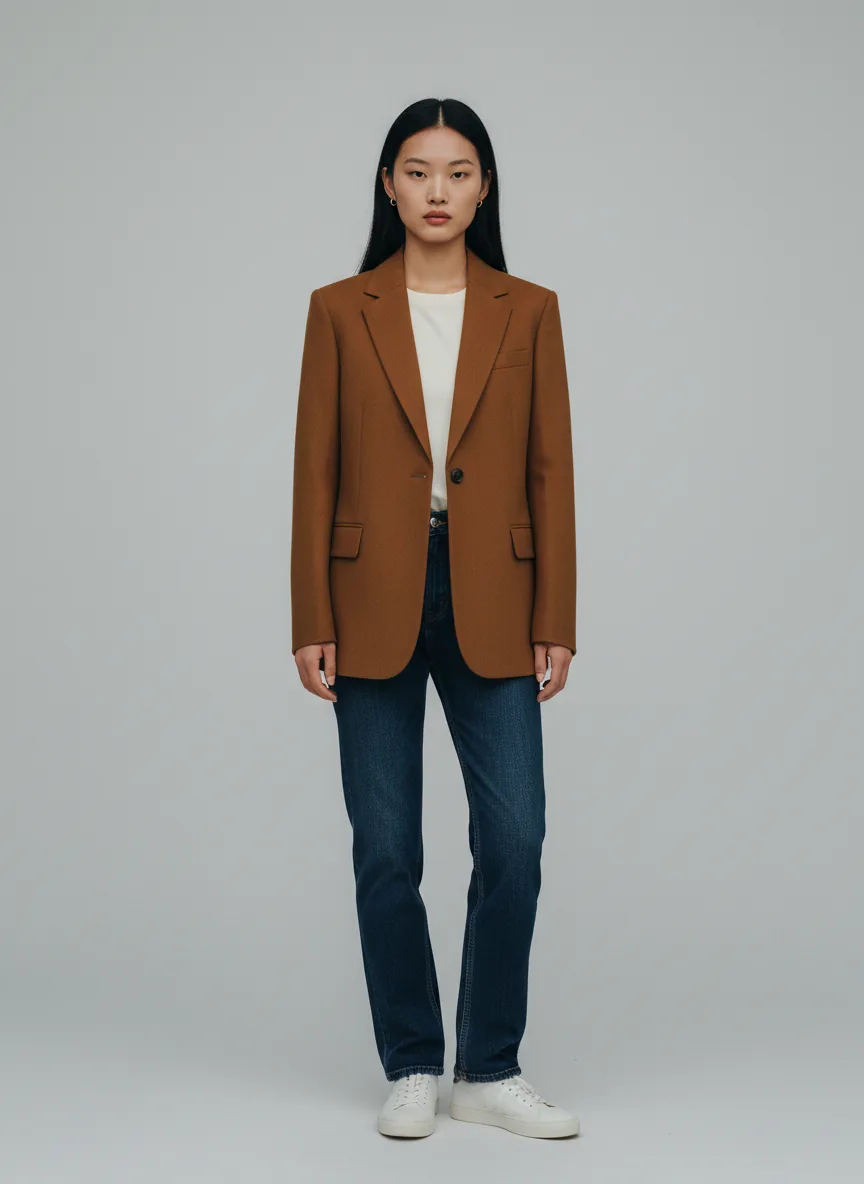
A small honesty note on the rendered jacket: the prompt asked for rust-olive, and Nano-Banana resolved that toward a warm tobacco-brown. Specific Pantone-style colour names ("rust-olive," "burnt sienna," "ultramarine") don't reproduce reliably in generation. If you need brand-accurate colour, render a base shot then run an image-to-image pass on a colour-specialised model — or just buy a colour-accurate sample at hero-shot time using Nano-Banana-Pro and accept the price.
Step 2 — Three-quarter angle, same garment
side = render("Nano-Banana", "3:4", ARIA, scene=(
    "full-body three-quarter angle from her right, Aria standing "
    "relaxed, wearing the same structured rust-olive wool blazer "
    "(single-breasted, two buttons, notch lapel, no pattern) over "
    "a plain ivory crew-neck t-shirt and straight-leg dark indigo "
    "denim jeans, simple white leather sneakers, hands by her "
    "sides, look-book lighting."
))
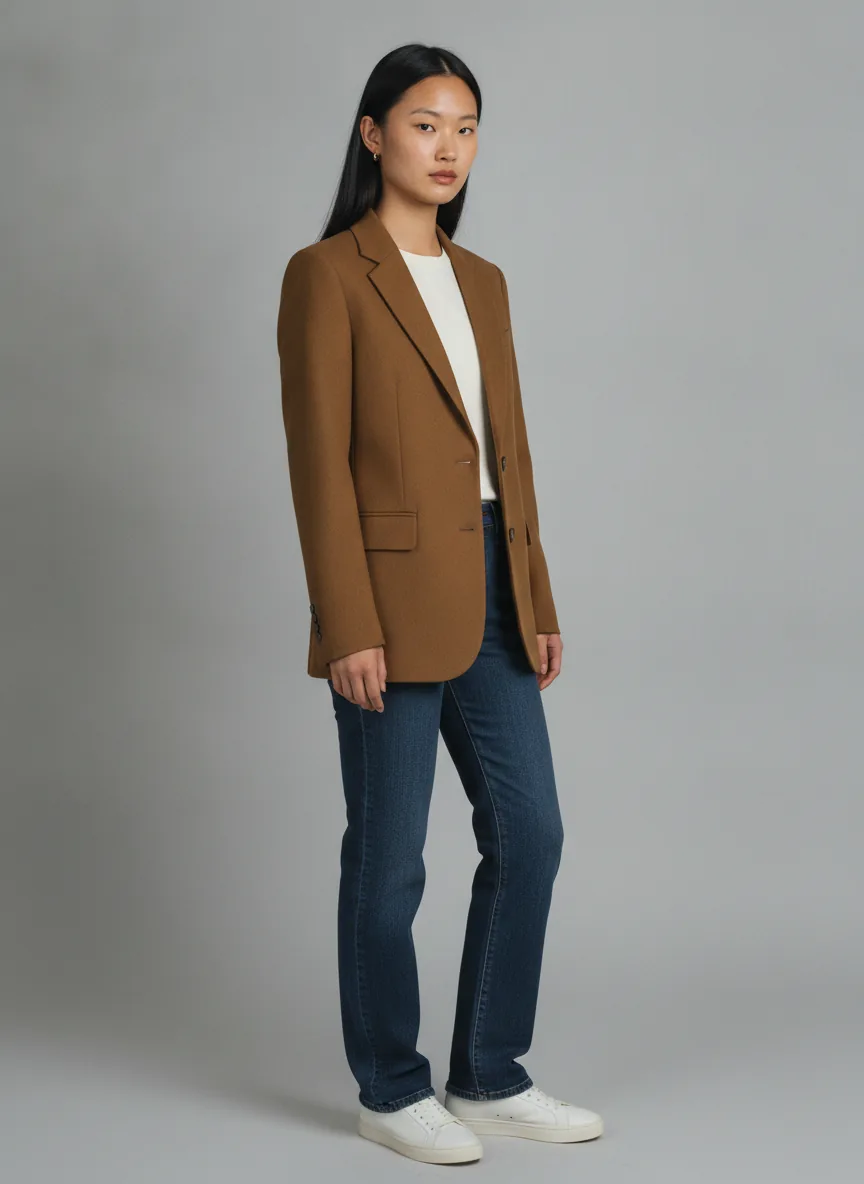
This is the bit that always trips up character-consistency demos: the same person, rotated. The face has to stay the same, the haircut has to stay the same, and the garment has to wear the same way on her body. Side-by-side, the two shots read as the same shoot — same model, same call sheet, same makeup chair. That's the result you need.
Step 3 — Same model, totally different garment
swap = render("Nano-Banana", "3:4", ARIA, scene=(
    "full-body straight-on frontal e-commerce shot, Aria standing "
    "relaxed with arms at sides, now wearing an oversized "
    "camel-coloured double-breasted wool overcoat (mid-thigh length, "
    "wide lapels, large mother-of-pearl buttons) over a black "
    "turtleneck and straight-leg charcoal trousers, black ankle "
    "boots, look-book lighting."
))
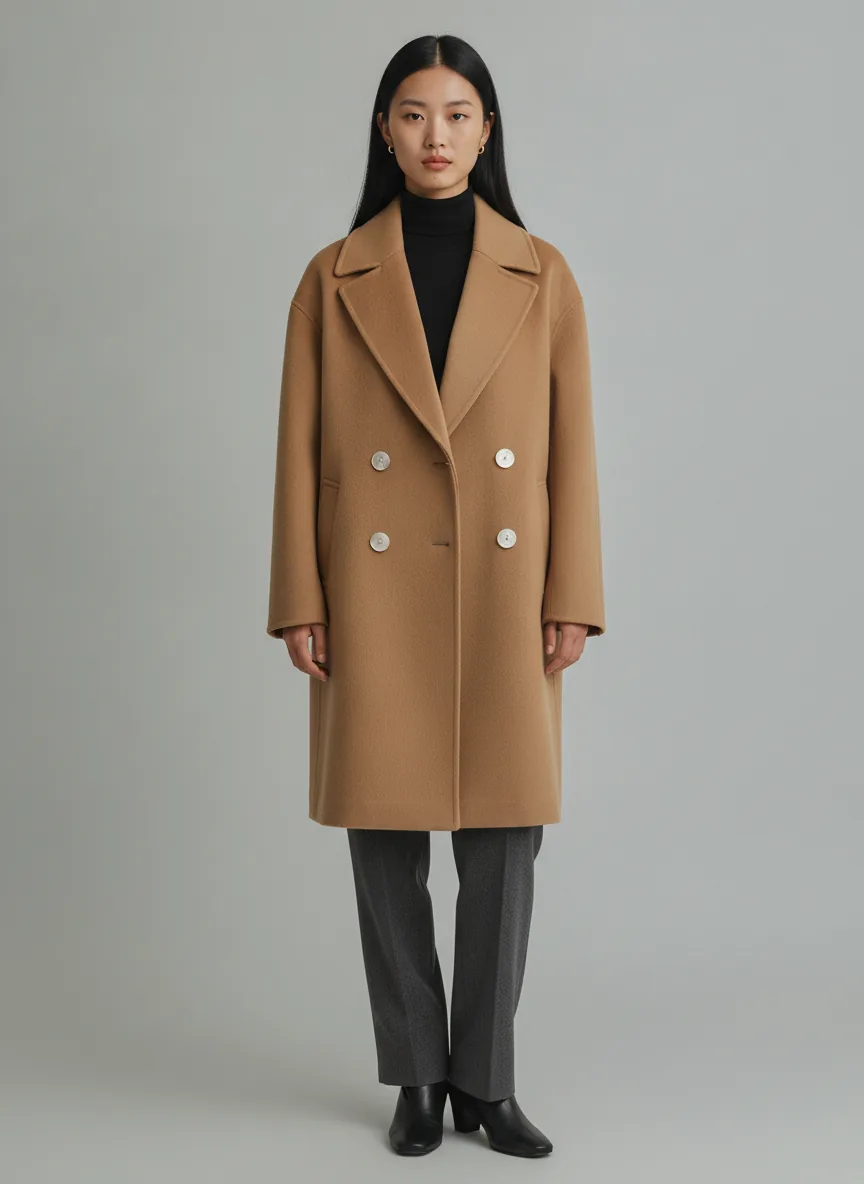
This is the demo that earns Nano-Banana its character-consistency tag. Same face, same beauty mark just below the left eye, same hair length and parting, same gold studs, same posture vocabulary — only the wardrobe and the silhouette change. If you're building a virtual-try-on flow, an automated lookbook generator, or a batch-produced PDP shoot, this is the exact transformation you'll be running a few thousand times.
When to reach for Nano-Banana-Pro
I rendered one extra shot of Mira on Nano-Banana-Pro at 1K, $0.17, just to anchor the cost-quality tradeoff:
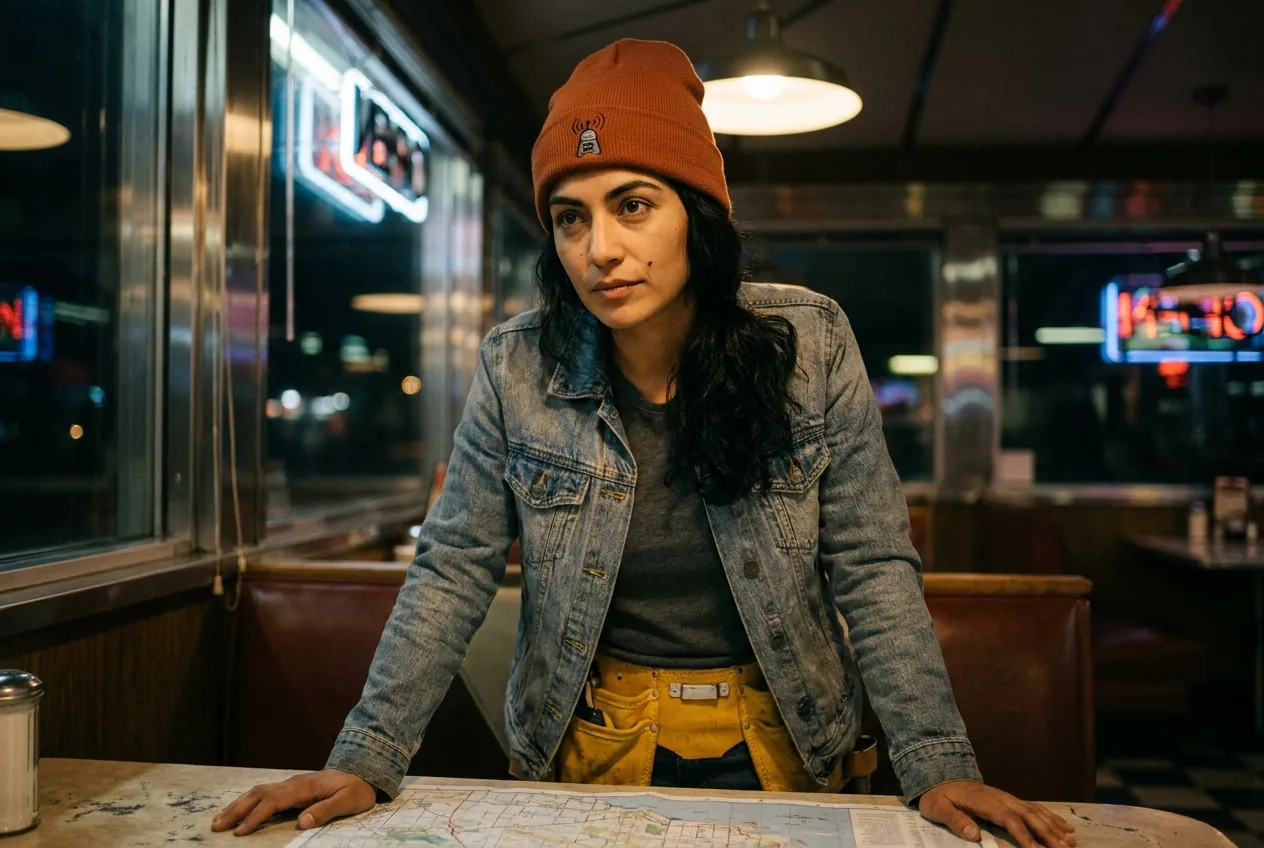
Same Mira bible. Same " | Scene: " separator. Only the model name changed. What you actually get for the extra $0.12 per image (Pro at $0.17 vs flat Nano-Banana at $0.05):
- Sharper micro-detail — individual hairs, denim weave texture, the embroidered patch on the beanie.
- Stronger preservation of less obvious identity markers — the eye shape and the slope of the brow read more like the rest of the Mira set.
- Better small-text rendering. If your scene needs a sign, a label, or a logo to be legible at thumbnail size, Pro is the one you want.
For high-volume use (think hundreds of frames per day for a storyboard or for programmatic catalogue generation), flat Nano-Banana at $0.05 is the right default and Nano-Banana-2 at 2K for $0.076 is the production sweet spot. Reserve Pro for the hero frames — the cover image, the lookbook hero, the marketing one-pager.
Cost summary for this post
| Render | Model | Tier | Price |
|---|---|---|---|
| cover (Mira solar farm) | Nano-Banana | 16:9 flat | $0.05 |
| character sheet | Nano-Banana | 3:2 flat | $0.05 |
| storyboard 1 — workshop | Nano-Banana | 3:2 flat | $0.05 |
| storyboard 2 — rooftop | Nano-Banana | 3:2 flat | $0.05 |
| ecomm — frontal | Nano-Banana | 3:4 flat | $0.05 |
| ecomm — side | Nano-Banana | 3:4 flat | $0.05 |
| ecomm — wardrobe swap | Nano-Banana | 3:4 flat | $0.05 |
| pro comparison shot | Nano-Banana-Pro | 3:2, 1K | $0.17 |
| Total | $0.52 |
Eight images, one Bearer token, one HTTP endpoint, no SDK assembly, no upstream account management — that is what hiapi is for.
Practical rules I keep coming back to
- Write the bible once, in source control, in a constants module. Treat it like any other config string. Version it.
- One name per bible. "Mira," "Aria." Even if the model never surfaces the name, having it in the prompt is a stable handle.
- Pick three identity markers and ride them hard. For Mira it's the antenna-patch beanie, the yellow toolbelt, and the small mole. For Aria it's the beauty mark, the centre-parted hair, the gold studs. If those three survive a render, the character survives the render.
- Don't trust Pantone-style colour names. "Rust-olive" drifted to tobacco brown. If a colour matters, render and then colour-correct downstream, or use Pro and a deliberate brand sample shot.
- Keep your photographic style stamp at the end of the bible. "Cinematic 35mm" or "50mm portrait lens, slight matte film finish" — putting it last lets it survive truncation in long prompts.
- Render the character sheet first and expect it to drift toward toon. That's normal. The sheet is for you, not for publication. Production shots use the same bible with in-scene prompt fragments and stay photoreal.
Nano-Bananafor drafts,Nano-Banana-2at 2K for production batches ($0.076 — cheaper than its own 1K tier),Nano-Banana-Profor hero shots. Build a tiny dispatcher in your client that picks the model from aqualityarg and forwards the right resolution.- The flat
Nano-Bananarejectsresolution. Gate that field on the model name in your client. Hard-learned 400.
That's the workflow. Take a bible, pick three identity markers, build a scene fragment, fire it through POST /v1/tasks, and the same person walks out the other end of every render.