
On this page
CC Switch install and one-click import
Install CC Switch and use the HiAPI connect page to import a configuration into Claude Code, Codex and OpenCode without editing config files.
Claude Code, Codex CLI, Codex Desktop and OpenCode can all import HiAPI through CC Switch. The steps below use Codex CLI and gpt-6-astra as the example and follow the CC Switch 4.0.10 interface; button names may differ slightly in newer versions. For the values to check when importing other tools, see Import values by tool at the end. Claude Code’s import entry is not on the connect page but on the API Keys page; see Claude Code.
1. Download and install CC Switch
- Open the CC Switch download page and scroll down to Assets. On a Mac, download
CC-Switch-v<version>-macOS.dmg. Do not download Source code or.sig.
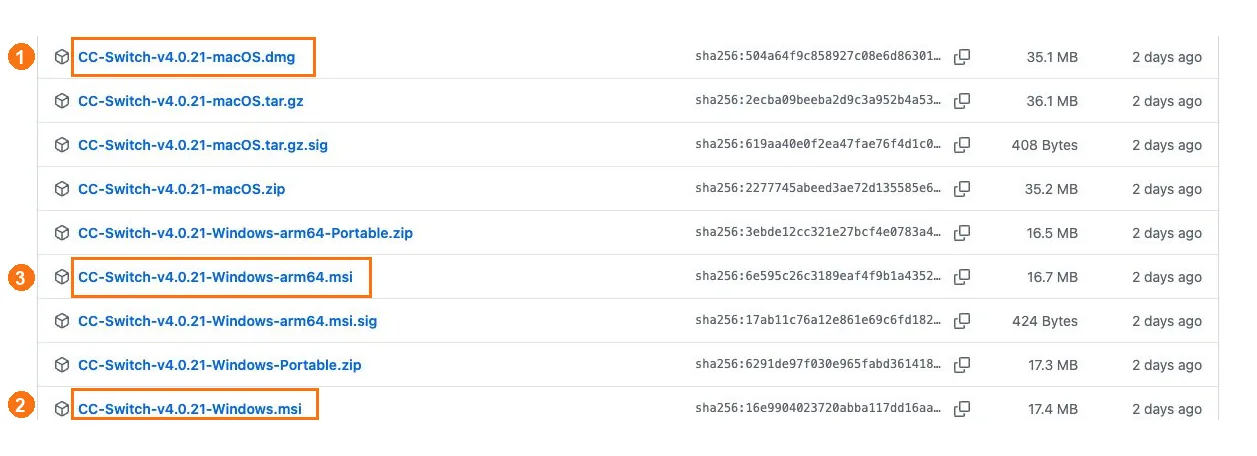
① Mac: choose macOS.dmg; ② Windows x64: choose Windows.msi; ③ Windows ARM64: choose Windows-arm64.msi.
- Double-click the downloaded
.dmgand drag CC Switch.app into Applications, then open it from Applications. If the system asks whether to open it, check where the app came from and click Open. If you already have CC Switch, just open it. - On Windows x64, download
Windows.msi; on ARM64, downloadWindows-arm64.msi. Finish the installer, then open CC Switch from the Start menu.
2. Back up your current configuration (optional)
If you already have providers, first note the name of the card marked In use on the matching tool page (for example Codex) so you can switch back later. To back up, click Settings → Data → SQL import/export → Export SQL backup and save it to a private folder on this machine. A backup may contain keys, so do not share it.
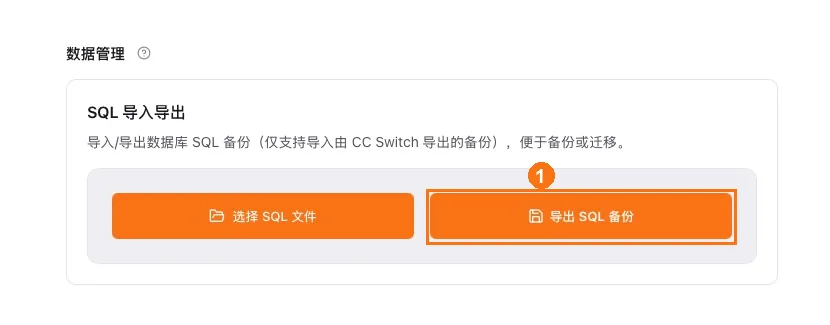
① Click Export SQL backup and save it locally.
3. Choose a HiAPI key
Create or choose a key as described in Get an API Key, and note its name. The import dialog picks the key by name, so you do not need to copy the key now.
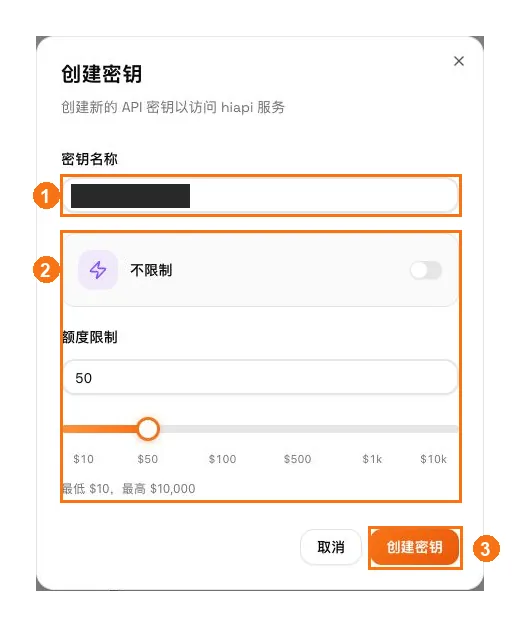
① Enter a key name; ② choose unlimited or a spending limit as needed; ③ click Create key.
4. Prepare the import on the connect page
- Open the HiAPI connect page. Select API Key setup first, then choose tool → command line or desktop → model → system in order. For Codex that is Codex → Command line → gpt-6-astra → macOS.
- Click Import to CC Switch. In the dialog, confirm the tool and model, pick the key name you noted in the API Key dropdown, and check the protocol and address at the bottom (for Codex: Responses API ·
https://api.hiapi.ai/v1).
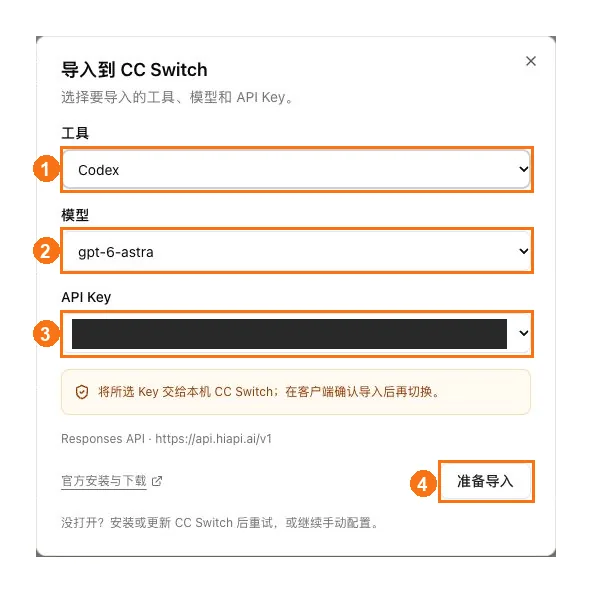
① Choose Codex as the tool; ② choose gpt-6-astra as the model; ③ pick an existing key by name; ④ check the Responses endpoint below, then click Prepare import.
- Click Prepare import. When the page says it is ready and asks you to confirm in the client, click Open CC Switch. At this point the import is only prepared; the provider is not enabled yet.
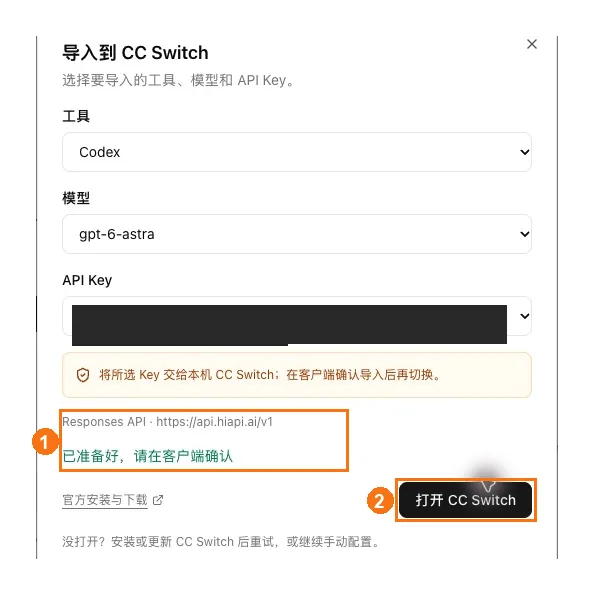
① Check the endpoint and the ready message; ② click Open CC Switch.
- When the browser asks whether to open an external app, confirm it is CC Switch and allow it this time; you do not need to tick “Always allow”. If the client does not open, open CC Switch manually and click Open CC Switch on the page again.
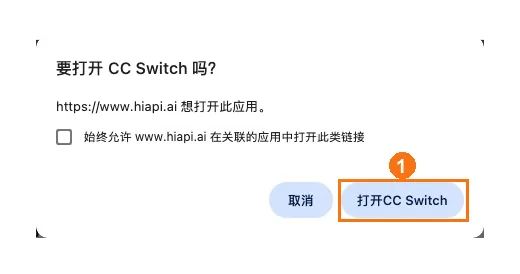
① Click Open CC Switch and allow it this time.
5. Confirm the import in CC Switch
- In the “Confirm provider import” window, check the app type, provider name, API endpoint and model; the API key should be filled in and stay hidden. For Codex:
| Field | Expected value |
|---|---|
| App type | Codex |
| Provider name | HiAPI - gpt-6-astra |
| API endpoint | https://api.hiapi.ai/v1 |
| Model | gpt-6-astra |
| API key | Filled in and hidden |
- Leave Switch to this provider immediately after import off, then click Import in the lower right. This saves the configuration first and enables it in the next step.
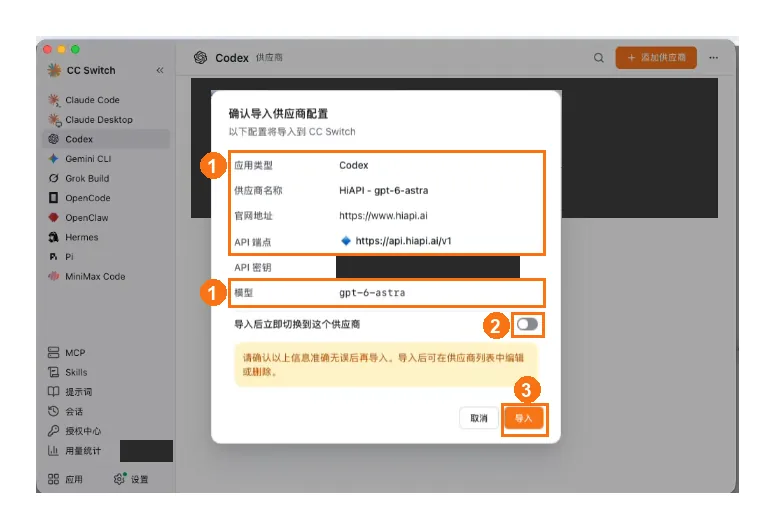
① Check Codex, the provider name, the API endpoint and the model; ② leave the immediate switch off; ③ click Import.
- Back on the matching tool page in CC Switch, a
HiAPI - gpt-6-astracard means the import worked, but it is not enabled yet. If the card already exists, you do not need to import again.
6. Enable HiAPI
- Wait for the tool’s running task to finish first. On the tool’s page in CC Switch (for example Codex → Direct), find the HiAPI card.
- Click the card’s Switch / Enable button (a triangle in 4.0.10; hover to see the label). HiAPI is enabled only when the HiAPI card is marked In use. If the tool page is not set to Direct at the top (for example, you have several providers rotating), click Back to direct first, then switch the card.
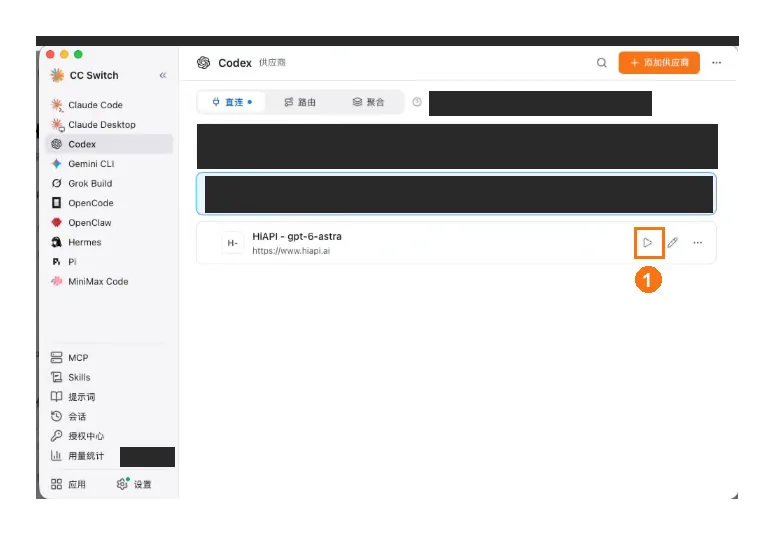
Screenshot taken before the click: HiAPI is imported but not enabled, and the original provider is still in use. The card footer shows the website address; the API endpoint is whatever the confirmation window showed.
- Quit and reopen the client you are setting up so the new configuration takes effect. To switch back to your original provider later, switch to its card here and reopen the client.
Import values by tool
| Tool | What to choose on the connect page | App type | API endpoint | Tutorial |
|---|---|---|---|---|
| Claude Code | Click “Import CCS” to the right of the key on the API Keys page | Claude Code | https://api.hiapi.ai | Claude Code |
| Codex CLI | Codex → Command line → gpt-6-astra | Codex | https://api.hiapi.ai/v1 | Codex CLI |
| Codex Desktop | Codex → Desktop → gpt-6-astra | Codex | https://api.hiapi.ai/v1 | Codex Desktop |
| OpenCode | OpenCode → Command line → your model | OpenCode | https://api.hiapi.ai/v1 | OpenCode |
Codex CLI and Codex Desktop may share the local Codex configuration, so switching in CC Switch changes both.