
On this page
DeepSeek Harness
Fill in HiAPI in the custom model form of the DeepSeek Harness web version to use DeepSeek and GPT models through HiAPI.
DeepSeek Harness can connect to HiAPI through the custom model API in its web version. The steps below use deepseek-v4.1-flash as the example; HiAPI uses the OpenAI Chat Completions protocol. If you need GPT, see step 6. This tutorial was verified on Mac with DeepSeek Harness 0.2.1-rc.2 (web version) for install, saving the configuration and choosing a model; some screenshots come from the Edge browser on Windows. Do not enter a HiAPI API key into the sign-in box for an official DeepSeek account.
1. Install Node.js
Install LTS 22.19 or later as described in Node.js setup, and skip it if you already have it. Then run the two commands below in a terminal; seeing version numbers is enough:
node --version
npm --version
2. Install and start Harness
- On a Mac, open a terminal and run each line:
npx --yes @deepseek-ai/dsh@0.2.1-rc.2 --version
npx --yes @deepseek-ai/dsh@0.2.1-rc.2 web
The first command downloads the official package on its first run and shows the version; the second starts the web service. In Windows PowerShell, replace npx with npx.cmd in both commands.
- Once you see
dsh web:and a local address, the browser usually opens by itself. If it doesn’t, copy the full authenticated URL printed in your terminal (including the auth parameters) and paste it into the address bar of a browser on the same computer; do not type just the port address.

① Confirm it shows 0.2.1-rc.2; ② use the full authenticated URL after dsh web in your terminal. The auth token in the screenshot is hidden.
- Keep the service terminal open: the browser is only the front end, and the service stops when you close the terminal. To use it again later, run the start command again and open the newly printed address; when you’re done, go back to this terminal and press Ctrl+C.
3. Open the main interface and model settings
- When the “preview version notes” appear for the first time, continue as the page suggests; close the official API key / account entry under “Get started” (开始使用) first, and enter the main interface.
- Keep Default workspace (默认工作区) and the standard mode above the input box.
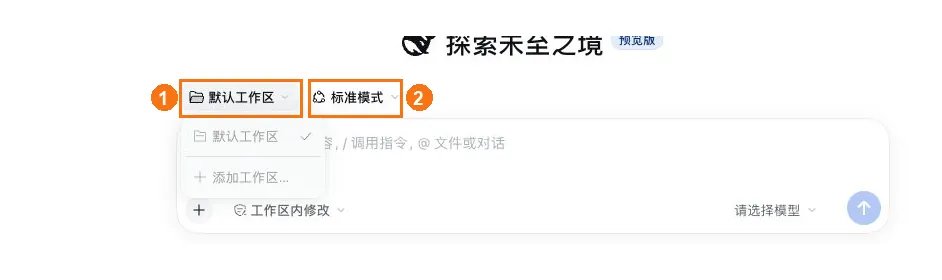
① Keep the default workspace; ② keep the standard mode.
- Click More → Settings (更多 → 设置) in the lower left, then click Models (模型) on the left.
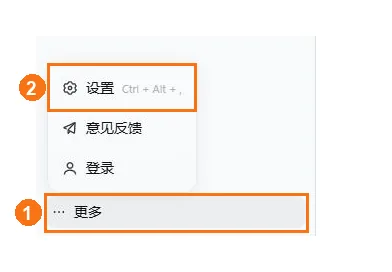
① Click More in the lower left; ② click Settings. 2026-10-26, Windows Edge, Harness 0.2.1-rc.2.
- On the model settings page, click Add model provider (添加模型提供商), then switch to Custom model API (自定义模型 API).
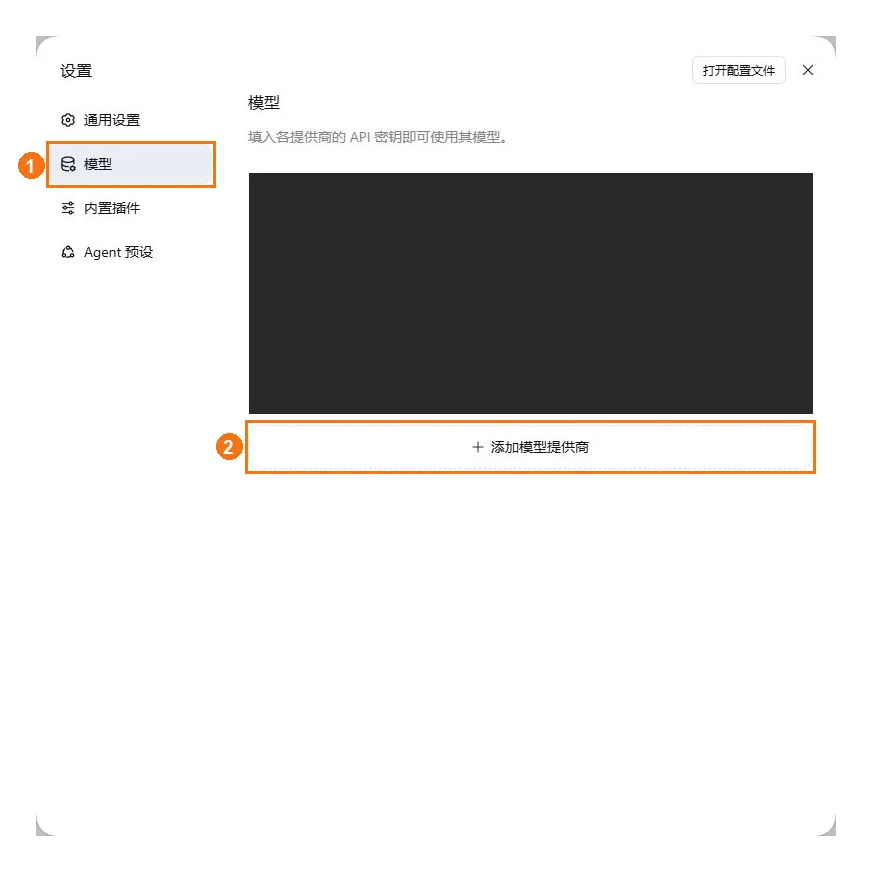
① Click Models on the left; ② click Add model provider. 2026-10-26, Windows Edge, Harness 0.2.1-rc.2.
4. Get a HiAPI API key
Prepare a key as described in Get an API Key, click the copy icon next to the key, and copy the full HiAPI API key; you will paste it into the API key (API 密钥) field in the next step.
5. Fill in DeepSeek and save the provider
- In Custom model API (自定义模型 API), fill in each item:
| Field | Value |
|---|---|
| Provider ID | hiapi-deepseek |
| Display name (显示名称) | HiAPI · DeepSeek |
| API address (API 地址) | https://api.hiapi.ai/v1 |
| API protocol (API 协议) | OpenAI Chat Completions |
| API key (API 密钥) | your HiAPI API key |
- Under Model catalog (模型目录), click Add model (添加模型). In the new row, fill the model ID with
deepseek-v4.1-flashand the display name withDeepSeek V4.1 Flash. A provider without any models is unusable.
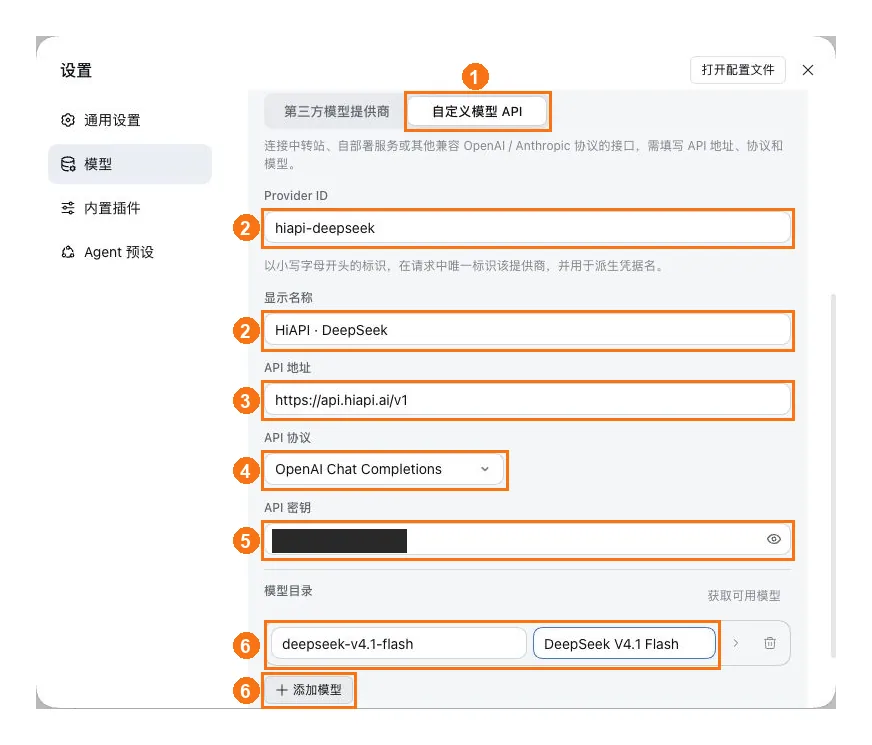
① Click Custom model API; ② fill in the Provider ID and display name; ③ set the API address to https://api.hiapi.ai/v1; ④ choose OpenAI Chat Completions as the protocol; ⑤ paste the full HiAPI API key; ⑥ click Add model first, then fill in the DeepSeek model ID and display name. The create button is further down; scroll down to save.
- Scroll to the bottom of the form and click Create provider (创建提供商). Back on the model list you should see HiAPI · DeepSeek. If a provider with the same name already exists, edit that entry and save instead of creating another one with the same ID.
- If you only use DeepSeek, skip straight to step 7 to choose a model.
6. Add a Responses configuration when you need GPT
- When you need
gpt-6-astra, click Add model provider → Custom model API (添加模型提供商 → 自定义模型 API) again and fill in the table below:
| Field | Value |
|---|---|
| Provider ID | hiapi-gpt |
| Display name (显示名称) | HiAPI · GPT |
| API address (API 地址) | https://api.hiapi.ai/v1 |
| API protocol (API 协议) | OpenAI Responses |
| API key (API 密钥) | your HiAPI API key |
| Model ID after clicking Add model (添加模型) | gpt-6-astra |
| Model display name (模型显示名称) | GPT-6 Astra |
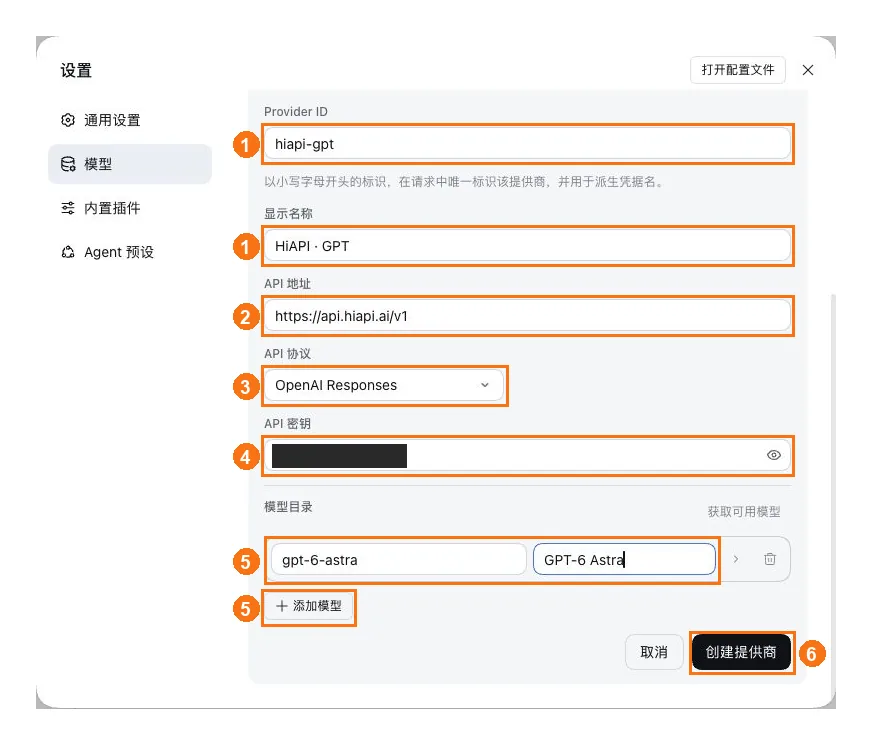
① Fill in the Provider ID and display name; ② set the API address to https://api.hiapi.ai/v1; ③ choose OpenAI Responses as the protocol; ④ paste the full HiAPI API key; ⑤ click Add model first, then fill in gpt-6-astra and the display name; ⑥ click Create provider to save.
- Scroll down and click Create provider (创建提供商). Choose OpenAI Responses as the protocol for GPT and OpenAI Chat Completions for DeepSeek; the API address only goes up to
/v1, so do not add/responsesor/chat/completions.
7. Choose a model and start
- Click × in the upper right of settings to return to the chat. Keep Default workspace (默认工作区) above the input box; for the agent preset you can use Standard mode (标准模式).
- Click Choose a model (请选择模型) in the lower right of the input box, and under the HiAPI · DeepSeek group click DeepSeek V4.1 Flash; if you configured GPT, you can also choose GPT-6 Astra under the HiAPI · GPT group.
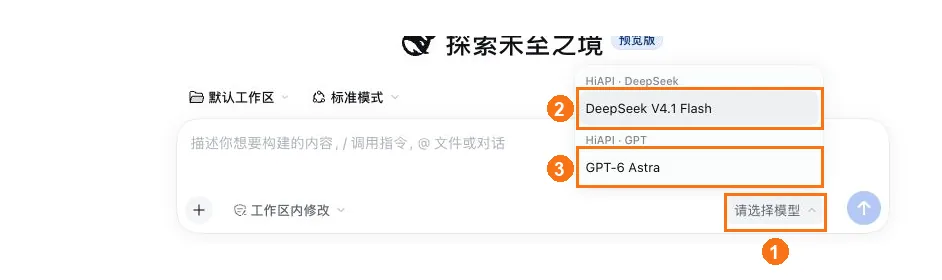
① Click Choose a model to open the menu; ② choose DeepSeek V4.1 Flash; ③ or choose GPT-6 Astra (either one).
- Once the model name next to the input box updates, keep the default permissions and send “Hello, introduce yourself in one sentence.” A normal reply means the connection works. The provider and model are already saved, so next time just pick them from the model menu after starting.
Troubleshooting
Only issues specific to DeepSeek Harness are listed here. For common errors such as 401, 404 and 429, see Common errors.
| Symptom | Cause | Fix |
|---|---|---|
| The browser says unauthorized after opening | You entered only the port address without the auth parameters | Copy the full authenticated URL printed in the terminal and open that |
| The page suddenly can’t connect | The terminal running the service was closed | Run the start command again and open the newly printed address |
| The model menu has no HiAPI model | You created the provider but did not click Add model (添加模型) | Edit the provider, add the model ID under the model catalog and save |
| 401 | The HiAPI API key is wrong, or you entered it in the official DeepSeek account sign-in box | Paste it again in the provider’s API key (API 密钥) field |