
MCP one-click
HiAPI Remote MCP lets Claude, ChatGPT, Codex and other AI clients generate images, videos, and audio through HiAPI.
Choose your AI tool
Send this prompt to Codex
Paste it into the chat inside this client; it configures the connection and starts the authorization for you.
- 1 Click "Copy prompt"
- 2 Paste it into Codex and send
- 3 Your browser opens HiAPI's approval page: sign in, pick a quota and approve
Please connect HiAPI MCP in the environment I actually use. Call out every step I have to do myself (clicking a button in the client, approving in the browser) — that's all I'll do; don't ask me to paste commands, codes, or callback URLs.

Target client: Codex
Server name: hiapi
MCP URL: https://mcp.hiapi.ai/mcp (Streamable HTTP + OAuth)

Do these in order:
1. Confirm you are Codex and state the environment evidence you relied on (the platform, and whether your own config or plugin directory exists) — a self-declaration isn't enough. Do all the setup below in the environment you actually run in (macOS / Linux / Windows / WSL, local or remote server).
2. Run `codex mcp get hiapi` first. Only if it doesn't exist, run: `codex mcp add hiapi --url https://mcp.hiapi.ai/mcp --oauth-client-id hiapi-codex`. If it already exists with the same URL, keep it.
3. Codex opens the browser for approval right after adding; wait for me to finish. If it doesn't, or `codex mcp list` still shows hiapi as not logged in, run `codex mcp login hiapi` and wait for me to approve in the browser. The HiAPI approval page opens next, where I'll sign in, approve, and set a quota; if the browser can't open, give me the link as described above. Start sign-in at most once.
4. After approval, call hiapi's get_balance to confirm it works; if the call fails, you may retry once, and if it fails again, stop and show me the exact error. Don't call any tool that costs money (image, video, audio, or text generation). If this session can't see hiapi's tools yet, ask me to restart it instead of signing in again.
5. Keep other entries when editing config files, and never print access tokens, authorization codes, code_verifier, or other credentials in chat, logs, or command echo.
6. When done, report briefly in two parts. What you verified yourself: which config you changed (a file or an in-app setting; say so if it was already there and left alone), and the balance check result with the balance. What I need to confirm: whether I approved in the browser, and whether I need to restart the client.

If what you find differs only slightly from these steps (for example the config file doesn't exist yet, or an existing entry is formatted a little differently), go with what's actually there and point out each deviation in your report. If a screen or setting isn't there, a command doesn't exist, you aren't the client named above, or a change outside these steps would be needed, stop and tell me what you see instead of guessing another way.
Report only what you actually did and saw. For my side (for example, whether I approved in the browser), if you can't see it, write "waiting for you to confirm" instead of calling it done.
Manual setup
Prefer to edit it yourself? Copy the commands or file contents below.
https://mcp.hiapi.ai/mcpcodex mcp add hiapi --url https://mcp.hiapi.ai/mcp --oauth-client-id hiapi-codexcodex mcp login hiapiSend this prompt to Claude Code
Paste it into the chat inside this client; it configures the connection and starts the authorization for you.
- 1 Click "Copy prompt"
- 2 Paste it into Claude Code and send
- 3 Your browser opens HiAPI's approval page: sign in, pick a quota and approve
Please connect HiAPI MCP in the environment I actually use. Call out every step I have to do myself (clicking a button in the client, approving in the browser) — that's all I'll do; don't ask me to paste commands, codes, or callback URLs.

Target client: Claude Code
Server name: hiapi
MCP URL: https://mcp.hiapi.ai/mcp (Streamable HTTP + OAuth)

Do these in order:
1. Confirm you are Claude Code and state the environment evidence you relied on (the platform, and whether your own config or plugin directory exists) — a self-declaration isn't enough. Do all the setup below in the environment you actually run in (macOS / Linux / Windows / WSL, local or remote server).
2. Run `claude mcp get hiapi` first. Only if it doesn't exist, run: `claude mcp add --scope user --transport http hiapi https://mcp.hiapi.ai/mcp`. Keep --scope user: it writes to user-level config so the server works in every project. If it already exists with the same URL, keep it.
3. Only if hiapi shows as not authenticated, start sign-in once: run `claude mcp login hiapi`, or ask me to type /mcp in this session, pick hiapi, then choose Authenticate. The HiAPI approval page opens next, where I'll sign in, approve, and set a quota; if the browser can't open, give me the link as described above. Start sign-in at most once.
4. After approval, call hiapi's get_balance to confirm it works; if the call fails, you may retry once, and if it fails again, stop and show me the exact error. Don't call any tool that costs money (image, video, audio, or text generation). If this session can't see hiapi's tools yet, ask me to restart it instead of signing in again.
5. Keep other entries when editing config files, and never print access tokens, authorization codes, code_verifier, or other credentials in chat, logs, or command echo.
6. When done, report briefly in two parts. What you verified yourself: which config you changed (a file or an in-app setting; say so if it was already there and left alone), and the balance check result with the balance. What I need to confirm: whether I approved in the browser, and whether I need to restart the client.

If what you find differs only slightly from these steps (for example the config file doesn't exist yet, or an existing entry is formatted a little differently), go with what's actually there and point out each deviation in your report. If a screen or setting isn't there, a command doesn't exist, you aren't the client named above, or a change outside these steps would be needed, stop and tell me what you see instead of guessing another way.
Report only what you actually did and saw. For my side (for example, whether I approved in the browser), if you can't see it, write "waiting for you to confirm" instead of calling it done.
Manual setup
Prefer to edit it yourself? Copy the commands or file contents below.
https://mcp.hiapi.ai/mcpclaude mcp add --scope user --transport http hiapi https://mcp.hiapi.ai/mcpclaude mcp login hiapiSend this prompt to Cursor
Paste it into the chat inside this client; it configures the connection and starts the authorization for you.
- 1 Click "Copy prompt"
- 2 Paste it into Cursor and send
- 3 Your browser opens HiAPI's approval page: sign in, pick a quota and approve
Please connect HiAPI MCP in the environment I actually use. Call out every step I have to do myself (clicking a button in the client, approving in the browser) — that's all I'll do; don't ask me to paste commands, codes, or callback URLs.

Target client: Cursor
Server name: hiapi
MCP URL: https://mcp.hiapi.ai/mcp (Streamable HTTP + OAuth)

Do these in order:
1. Confirm you are Cursor and state the environment evidence you relied on (the platform, and whether your own config or plugin directory exists) — a self-declaration isn't enough. Do all the setup below in the environment you actually run in (macOS / Linux / Windows / WSL, local or remote server).
2. Read the user-level ~/.cursor/mcp.json and, only if mcpServers has no "hiapi", merge in: {"mcpServers":{"hiapi":{"url":"https://mcp.hiapi.ai/mcp"}}}. Keep the JSON valid, leave other entries alone, and don't write a fixed token or Authorization header.
3. After writing the config, ask me to open Customize → MCPs from Cursor's left sidebar, find hiapi (it shows Needs authentication), and click Authenticate. If hiapi isn't listed, ask me to restart Cursor first; if it's still missing, ask me to click New MCP Server in Customize → MCPs and enter the URL above. On older Cursor (before 3.9) this lives in Cursor Settings → MCP. The HiAPI approval page opens next, where I'll sign in, approve, and set a quota; if the browser can't open, give me the link as described above. Start sign-in at most once.
4. After approval, call hiapi's get_balance to confirm it works; if the call fails, you may retry once, and if it fails again, stop and show me the exact error. Don't call any tool that costs money (image, video, audio, or text generation). If this session can't see hiapi's tools yet, ask me to restart it instead of signing in again.
5. Keep other entries when editing config files, and never print access tokens, authorization codes, code_verifier, or other credentials in chat, logs, or command echo.
6. When done, report briefly in two parts. What you verified yourself: which config you changed (a file or an in-app setting; say so if it was already there and left alone), and the balance check result with the balance. What I need to confirm: whether I approved in the browser, and whether I need to restart the client.

If what you find differs only slightly from these steps (for example the config file doesn't exist yet, or an existing entry is formatted a little differently), go with what's actually there and point out each deviation in your report. If a screen or setting isn't there, a command doesn't exist, you aren't the client named above, or a change outside these steps would be needed, stop and tell me what you see instead of guessing another way.
Report only what you actually did and saw. For my side (for example, whether I approved in the browser), if you can't see it, write "waiting for you to confirm" instead of calling it done.
Manual setup
Prefer to edit it yourself? Copy the commands or file contents below.
https://mcp.hiapi.ai/mcp{"mcpServers":{"hiapi":{"url":"https://mcp.hiapi.ai/mcp"}}}Customize → MCPs → hiapi → AuthenticateSend this prompt to OpenCode
Paste it into the chat inside this client; it configures the connection and starts the authorization for you.
- 1 Click "Copy prompt"
- 2 Paste it into OpenCode and send
- 3 Your browser opens HiAPI's approval page: sign in, pick a quota and approve
Please connect HiAPI MCP in the environment I actually use. Call out every step I have to do myself (clicking a button in the client, approving in the browser) — that's all I'll do; don't ask me to paste commands, codes, or callback URLs.

Target client: OpenCode
Server name: hiapi
MCP URL: https://mcp.hiapi.ai/mcp (Streamable HTTP + OAuth)

Do these in order:
1. Confirm you are OpenCode and state the environment evidence you relied on (the platform, and whether your own config or plugin directory exists) — a self-declaration isn't enough. Do all the setup below in the environment you actually run in (macOS / Linux / Windows / WSL, local or remote server).
2. In OpenCode's user-level ~/.config/opencode/opencode.json, add "hiapi" under mcp: {"type":"remote","url":"https://mcp.hiapi.ai/mcp","oauth":{"clientId":"hiapi-opencode"}}. Keep it if it already exists with the same URL; follow the official docs for your installed version.
3. Run `opencode mcp auth hiapi` once in the foreground and wait for it to finish (up to 5 minutes); don't rerun it or restart OpenCode meanwhile. Tell me: if the browser opens two HiAPI approval pages, approve only one and close the other. If the command times out or fails, show me the output instead of retrying. The HiAPI approval page opens next, where I'll sign in, approve, and set a quota; if the browser can't open, give me the link as described above. Start sign-in at most once.
4. After approval, call hiapi's get_balance to confirm it works; if the call fails, you may retry once, and if it fails again, stop and show me the exact error. Don't call any tool that costs money (image, video, audio, or text generation). If this session can't see hiapi's tools yet, ask me to restart it instead of signing in again.
5. Keep other entries when editing config files, and never print access tokens, authorization codes, code_verifier, or other credentials in chat, logs, or command echo.
6. When done, report briefly in two parts. What you verified yourself: which config you changed (a file or an in-app setting; say so if it was already there and left alone), and the balance check result with the balance. What I need to confirm: whether I approved in the browser, and whether I need to restart the client.

If what you find differs only slightly from these steps (for example the config file doesn't exist yet, or an existing entry is formatted a little differently), go with what's actually there and point out each deviation in your report. If a screen or setting isn't there, a command doesn't exist, you aren't the client named above, or a change outside these steps would be needed, stop and tell me what you see instead of guessing another way.
Report only what you actually did and saw. For my side (for example, whether I approved in the browser), if you can't see it, write "waiting for you to confirm" instead of calling it done.
Manual setup
Prefer to edit it yourself? Copy the commands or file contents below.
https://mcp.hiapi.ai/mcp"mcp":{"hiapi":{"type":"remote","url":"https://mcp.hiapi.ai/mcp","oauth":{"clientId":"hiapi-opencode"}}}opencode mcp auth hiapiSend this prompt to OpenClaw
Paste it into the chat inside this client; it configures the connection and starts the authorization for you.
- 1 Click "Copy prompt"
- 2 Paste it into OpenClaw and send
- 3 Your browser opens HiAPI's approval page: sign in, pick a quota and approve
Please connect HiAPI MCP in the environment I actually use. Call out every step I have to do myself (clicking a button in the client, approving in the browser) — that's all I'll do; don't ask me to paste commands, codes, or callback URLs.

Target client: OpenClaw
Server name: hiapi
MCP URL: https://mcp.hiapi.ai/mcp (Streamable HTTP + OAuth)

Do these in order:
1. Confirm you are OpenClaw and state the environment evidence you relied on (the platform, and whether your own config or plugin directory exists) — a self-declaration isn't enough. Do all the setup below in the environment you actually run in (macOS / Linux / Windows / WSL, local or remote server).
2. Run `openclaw mcp status --verbose` to check for "hiapi". Only if it doesn't exist, run: `openclaw mcp add hiapi --url https://mcp.hiapi.ai/mcp --transport streamable-http --auth oauth`. Keep --auth oauth: without it the pre-save probe hits a 401 and the server is never saved. If it already exists with the same URL, keep it.
3. Run `openclaw mcp login hiapi` and wait for me to approve in the browser. If OpenClaw runs on a server without a browser, send me the authorization link it prints; I'll open it on my computer and hand the result back, following its --code instructions if needed. The HiAPI approval page opens next, where I'll sign in, approve, and set a quota; if the browser can't open, give me the link as described above. Start sign-in at most once.
4. After approval, call hiapi's get_balance to confirm it works; if the call fails, you may retry once, and if it fails again, stop and show me the exact error. Don't call any tool that costs money (image, video, audio, or text generation). If this session can't see hiapi's tools yet, ask me to restart it instead of signing in again.
5. Keep other entries when editing config files, and never print access tokens, authorization codes, code_verifier, or other credentials in chat, logs, or command echo.
6. When done, report briefly in two parts. What you verified yourself: which config you changed (a file or an in-app setting; say so if it was already there and left alone), and the balance check result with the balance. What I need to confirm: whether I approved in the browser, and whether I need to restart the client.

If what you find differs only slightly from these steps (for example the config file doesn't exist yet, or an existing entry is formatted a little differently), go with what's actually there and point out each deviation in your report. If a screen or setting isn't there, a command doesn't exist, you aren't the client named above, or a change outside these steps would be needed, stop and tell me what you see instead of guessing another way.
Report only what you actually did and saw. For my side (for example, whether I approved in the browser), if you can't see it, write "waiting for you to confirm" instead of calling it done.
Manual setup
Prefer to edit it yourself? Copy the commands or file contents below.
https://mcp.hiapi.ai/mcpopenclaw mcp add hiapi --url https://mcp.hiapi.ai/mcp --transport streamable-http --auth oauthopenclaw mcp login hiapiSend this prompt to Hermes Agent
Paste it into the chat inside this client; it configures the connection and starts the authorization for you.
- 1 Click "Copy prompt"
- 2 Paste it into Hermes Agent and send
- 3 Your browser opens HiAPI's approval page: sign in, pick a quota and approve
Please connect HiAPI MCP in the environment I actually use. Call out every step I have to do myself (clicking a button in the client, approving in the browser) — that's all I'll do; don't ask me to paste commands, codes, or callback URLs.

Target client: Hermes Agent
Server name: hiapi
MCP URL: https://mcp.hiapi.ai/mcp (Streamable HTTP + OAuth)

Do these in order:
1. Confirm you are Hermes Agent and state the environment evidence you relied on (the platform, and whether your own config or plugin directory exists) — a self-declaration isn't enough. Do all the setup below in the environment you actually run in (macOS / Linux / Windows / WSL, local or remote server).
2. In ~/.hermes/config.yaml, add "hiapi" under mcp_servers with url https://mcp.hiapi.ai/mcp and auth: oauth. Keep it if it already exists with the same URL; afterwards remind me to run /reload-mcp or restart the session.
3. Run `hermes mcp login hiapi`. Hermes waits only 60 seconds for this authorization: open the first printed link and approve right away (it usually opens the browser itself). After 60 seconds it retries and prints a new link — then use only the last one, because an older link fails with "State parameter mismatch". If that error already appeared, run `hermes mcp login hiapi` again instead of pasting callback URLs repeatedly. If I'm on SSH or a remote host, paste the callback URL back as prompted. The HiAPI approval page opens next, where I'll sign in, approve, and set a quota; if the browser can't open, give me the link as described above. Start sign-in at most once.
4. After approval, call hiapi's get_balance to confirm it works; if the call fails, you may retry once, and if it fails again, stop and show me the exact error. Don't call any tool that costs money (image, video, audio, or text generation). If this session can't see hiapi's tools yet, ask me to restart it instead of signing in again.
5. Keep other entries when editing config files, and never print access tokens, authorization codes, code_verifier, or other credentials in chat, logs, or command echo.
6. When done, report briefly in two parts. What you verified yourself: which config you changed (a file or an in-app setting; say so if it was already there and left alone), and the balance check result with the balance. What I need to confirm: whether I approved in the browser, and whether I need to restart the client.

If what you find differs only slightly from these steps (for example the config file doesn't exist yet, or an existing entry is formatted a little differently), go with what's actually there and point out each deviation in your report. If a screen or setting isn't there, a command doesn't exist, you aren't the client named above, or a change outside these steps would be needed, stop and tell me what you see instead of guessing another way.
Report only what you actually did and saw. For my side (for example, whether I approved in the browser), if you can't see it, write "waiting for you to confirm" instead of calling it done.
Manual setup
Prefer to edit it yourself? Copy the commands or file contents below.
https://mcp.hiapi.ai/mcpmcp_servers:
hiapi:
url: "https://mcp.hiapi.ai/mcp"
auth: oauthhermes mcp login hiapiSend this prompt to Trae
Paste it into the chat inside this client; it configures the connection and starts the authorization for you.
- 1 Click "Copy prompt"
- 2 Paste it into Trae and send
- 3 Your browser opens HiAPI's approval page: sign in, pick a quota and approve
Please connect HiAPI MCP in the environment I actually use. Call out every step I have to do myself (clicking a button in the client, approving in the browser) — that's all I'll do; don't ask me to paste commands, codes, or callback URLs.

Target client: Trae
Server name: hiapi
MCP URL: https://mcp.hiapi.ai/mcp (Streamable HTTP + OAuth)

Do these in order:
1. Confirm you are Trae and state the environment evidence you relied on (the platform, and whether your own config or plugin directory exists) — a self-declaration isn't enough. Do all the setup below in the environment you actually run in (macOS / Linux / Windows / WSL, local or remote server).
2. In the project's .trae/mcp.json, add "hiapi" under mcpServers as {"url":"https://mcp.hiapi.ai/mcp"} and don't add an Authorization header. Alternatively, ask me to paste the same JSON in Trae Settings → MCP → Add → Manual. Keep it if it already exists with the same URL.
3. Ask me to open Trae Settings → MCP, find hiapi, and follow the in-app prompt to authorize with OAuth (Trae v3.3.51 or newer). The browser opens the HiAPI approval page. The HiAPI approval page opens next, where I'll sign in, approve, and set a quota; if the browser can't open, give me the link as described above. Start sign-in at most once.
4. After approval, call hiapi's get_balance to confirm it works; if the call fails, you may retry once, and if it fails again, stop and show me the exact error. Don't call any tool that costs money (image, video, audio, or text generation). If this session can't see hiapi's tools yet, ask me to restart it instead of signing in again.
5. Keep other entries when editing config files, and never print access tokens, authorization codes, code_verifier, or other credentials in chat, logs, or command echo.
6. When done, report briefly in two parts. What you verified yourself: which config you changed (a file or an in-app setting; say so if it was already there and left alone), and the balance check result with the balance. What I need to confirm: whether I approved in the browser, and whether I need to restart the client.

If what you find differs only slightly from these steps (for example the config file doesn't exist yet, or an existing entry is formatted a little differently), go with what's actually there and point out each deviation in your report. If a screen or setting isn't there, a command doesn't exist, you aren't the client named above, or a change outside these steps would be needed, stop and tell me what you see instead of guessing another way.
Report only what you actually did and saw. For my side (for example, whether I approved in the browser), if you can't see it, write "waiting for you to confirm" instead of calling it done.
Manual setup
Prefer to edit it yourself? Copy the commands or file contents below.
https://mcp.hiapi.ai/mcp{"mcpServers":{"hiapi":{"url":"https://mcp.hiapi.ai/mcp"}}}Settings → MCP → hiapi → AuthorizeSend this prompt to VS Code
Paste it into the chat inside this client; it configures the connection and starts the authorization for you.
- 1 Click "Copy prompt"
- 2 Paste it into VS Code and send
- 3 Your browser opens HiAPI's approval page: sign in, pick a quota and approve
Please connect HiAPI MCP in the environment I actually use. Call out every step I have to do myself (clicking a button in the client, approving in the browser) — that's all I'll do; don't ask me to paste commands, codes, or callback URLs.

Target client: VS Code
Server name: hiapi
MCP URL: https://mcp.hiapi.ai/mcp (Streamable HTTP + OAuth)

Do these in order:
1. Confirm you are VS Code and state the environment evidence you relied on (the platform, and whether your own config or plugin directory exists) — a self-declaration isn't enough. Do all the setup below in the environment you actually run in (macOS / Linux / Windows / WSL, local or remote server).
2. Add it to the user-level MCP config with `code --add-mcp '{"name":"hiapi","type":"http","url":"https://mcp.hiapi.ai/mcp"}'`. If that command isn't available, merge {"servers":{"hiapi":{"type":"http","url":"https://mcp.hiapi.ai/mcp"}}} only when servers has no "hiapi", leaving other entries alone.
3. Ask me to click Start above hiapi in mcp.json and allow the sign-in prompt. VS Code opens the browser to finish OAuth. The HiAPI approval page opens next, where I'll sign in, approve, and set a quota; if the browser can't open, give me the link as described above. Start sign-in at most once.
4. After approval, call hiapi's get_balance to confirm it works; if the call fails, you may retry once, and if it fails again, stop and show me the exact error. Don't call any tool that costs money (image, video, audio, or text generation). If this session can't see hiapi's tools yet, ask me to restart it instead of signing in again.
5. Keep other entries when editing config files, and never print access tokens, authorization codes, code_verifier, or other credentials in chat, logs, or command echo.
6. When done, report briefly in two parts. What you verified yourself: which config you changed (a file or an in-app setting; say so if it was already there and left alone), and the balance check result with the balance. What I need to confirm: whether I approved in the browser, and whether I need to restart the client.

If what you find differs only slightly from these steps (for example the config file doesn't exist yet, or an existing entry is formatted a little differently), go with what's actually there and point out each deviation in your report. If a screen or setting isn't there, a command doesn't exist, you aren't the client named above, or a change outside these steps would be needed, stop and tell me what you see instead of guessing another way.
Report only what you actually did and saw. For my side (for example, whether I approved in the browser), if you can't see it, write "waiting for you to confirm" instead of calling it done.
Manual setup
Prefer to edit it yourself? Copy the commands or file contents below.
https://mcp.hiapi.ai/mcpcode --add-mcp '{"name":"hiapi","type":"http","url":"https://mcp.hiapi.ai/mcp"}'mcp.json → hiapi → StartSend this prompt to pi
Paste it into the chat inside this client; it configures the connection and starts the authorization for you.
- 1 Click "Copy prompt"
- 2 Paste it into pi and send
- 3 Your browser opens HiAPI's approval page: sign in, pick a quota and approve
Please connect HiAPI MCP in the environment I actually use. Call out every step I have to do myself (clicking a button in the client, approving in the browser) — that's all I'll do; don't ask me to paste commands, codes, or callback URLs.

Target client: pi
Server name: hiapi
MCP URL: https://mcp.hiapi.ai/mcp (Streamable HTTP + OAuth)

Do these in order:
1. Confirm you are pi and state the environment evidence you relied on (the platform, and whether your own config or plugin directory exists) — a self-declaration isn't enough. Do all the setup below in the environment you actually run in (macOS / Linux / Windows / WSL, local or remote server).
2. Run `pi mcp list` first. Only if "hiapi" is missing, run: `pi mcp add hiapi --url https://mcp.hiapi.ai/mcp`. Keep it if it already exists with the same URL. pi supports Streamable HTTP only, so don't switch it to SSE.
3. Run `pi mcp login hiapi` (or /mcp login hiapi inside a session) and wait for me to approve in the browser. If pi runs over SSH or on a remote host, paste the redirected URL back into the sign-in screen. The HiAPI approval page opens next, where I'll sign in, approve, and set a quota; if the browser can't open, give me the link as described above. Start sign-in at most once.
4. After approval, call hiapi's get_balance to confirm it works; if the call fails, you may retry once, and if it fails again, stop and show me the exact error. Don't call any tool that costs money (image, video, audio, or text generation). If this session can't see hiapi's tools yet, ask me to restart it instead of signing in again.
5. Keep other entries when editing config files, and never print access tokens, authorization codes, code_verifier, or other credentials in chat, logs, or command echo.
6. When done, report briefly in two parts. What you verified yourself: which config you changed (a file or an in-app setting; say so if it was already there and left alone), and the balance check result with the balance. What I need to confirm: whether I approved in the browser, and whether I need to restart the client.

If what you find differs only slightly from these steps (for example the config file doesn't exist yet, or an existing entry is formatted a little differently), go with what's actually there and point out each deviation in your report. If a screen or setting isn't there, a command doesn't exist, you aren't the client named above, or a change outside these steps would be needed, stop and tell me what you see instead of guessing another way.
Report only what you actually did and saw. For my side (for example, whether I approved in the browser), if you can't see it, write "waiting for you to confirm" instead of calling it done.
Manual setup
Prefer to edit it yourself? Copy the commands or file contents below.
https://mcp.hiapi.ai/mcppi mcp add hiapi --url https://mcp.hiapi.ai/mcppi mcp login hiapiSend this prompt to Gemini CLI
Paste it into the chat inside this client; it configures the connection and starts the authorization for you.
- 1 Click "Copy prompt"
- 2 Paste it into Gemini CLI and send
- 3 Your browser opens HiAPI's approval page: sign in, pick a quota and approve
Please connect HiAPI MCP in the environment I actually use. Call out every step I have to do myself (clicking a button in the client, approving in the browser) — that's all I'll do; don't ask me to paste commands, codes, or callback URLs.

Target client: Gemini CLI
Server name: hiapi
MCP URL: https://mcp.hiapi.ai/mcp (Streamable HTTP + OAuth)

Do these in order:
1. Confirm you are Gemini CLI and state the environment evidence you relied on (the platform, and whether your own config or plugin directory exists) — a self-declaration isn't enough. Do all the setup below in the environment you actually run in (macOS / Linux / Windows / WSL, local or remote server).
2. Run `gemini mcp list` to check for "hiapi". Only if it's missing, run: `gemini mcp add --scope user --transport http hiapi https://mcp.hiapi.ai/mcp`. Without --scope user it lands in the current project's .gemini/settings.json, so keep the flag. If it already exists with the same URL, keep it.
3. First make sure Gemini CLI is signed in with a Google account (or has a Gemini API key configured) — otherwise even /mcp commands in the TUI ask for a login first. Then run `/mcp auth hiapi` and wait for me to approve in the browser. The callback is http://localhost:<random-port>/oauth/callback on this machine; if this environment can't receive localhost callbacks, stop and tell me. The HiAPI approval page opens next, where I'll sign in, approve, and set a quota; if the browser can't open, give me the link as described above. Start sign-in at most once.
4. After approval, call hiapi's get_balance to confirm it works; if the call fails, you may retry once, and if it fails again, stop and show me the exact error. Don't call any tool that costs money (image, video, audio, or text generation). If this session can't see hiapi's tools yet, ask me to restart it instead of signing in again.
5. Keep other entries when editing config files, and never print access tokens, authorization codes, code_verifier, or other credentials in chat, logs, or command echo.
6. When done, report briefly in two parts. What you verified yourself: which config you changed (a file or an in-app setting; say so if it was already there and left alone), and the balance check result with the balance. What I need to confirm: whether I approved in the browser, and whether I need to restart the client.

If what you find differs only slightly from these steps (for example the config file doesn't exist yet, or an existing entry is formatted a little differently), go with what's actually there and point out each deviation in your report. If a screen or setting isn't there, a command doesn't exist, you aren't the client named above, or a change outside these steps would be needed, stop and tell me what you see instead of guessing another way.
Report only what you actually did and saw. For my side (for example, whether I approved in the browser), if you can't see it, write "waiting for you to confirm" instead of calling it done.
Manual setup
Prefer to edit it yourself? Copy the commands or file contents below.
https://mcp.hiapi.ai/mcpgemini mcp add --scope user --transport http hiapi https://mcp.hiapi.ai/mcp/mcp auth hiapiSend this prompt to Kimi Code CLI
Paste it into the chat inside this client; it configures the connection and starts the authorization for you.
- 1 Click "Copy prompt"
- 2 Paste it into Kimi Code CLI and send
- 3 Your browser opens HiAPI's approval page: sign in, pick a quota and approve
Please connect HiAPI MCP in the environment I actually use. Call out every step I have to do myself (clicking a button in the client, approving in the browser) — that's all I'll do; don't ask me to paste commands, codes, or callback URLs.

Target client: Kimi Code CLI
Server name: hiapi
MCP URL: https://mcp.hiapi.ai/mcp (Streamable HTTP + OAuth)

Do these in order:
1. Confirm you are Kimi Code CLI and state the environment evidence you relied on (the platform, and whether your own config or plugin directory exists) — a self-declaration isn't enough. Do all the setup below in the environment you actually run in (macOS / Linux / Windows / WSL, local or remote server).
2. Kimi Code CLI keeps remote MCP servers under mcpServers in the user-level ~/.kimi-code/mcp.json (or $KIMI_CODE_HOME/mcp.json when set); an HTTP entry only needs url, no transport. Run `kimi --version` first; if it's missing, install it the official way: `curl -fsSL https://code.kimi.com/kimi-code/install.sh | bash` (installs to ~/.kimi-code, and the script adds its PATH to your shell config). Then read mcp.json and merge in {"url":"https://mcp.hiapi.ai/mcp"} only if "hiapi" is missing. Keep it if it already exists with the same URL, don't add it twice, and leave other entries alone.
3. Inside Kimi Code, run `/mcp-config login hiapi` to start browser authorization. That needs a Kimi account login or a configured model first: if it says `LLM not set`, run `/login` (or configure a provider with `/provider`) and then `/mcp-config login hiapi` again. After approval, `/mcp` should show hiapi as connected with its tools. The HiAPI approval page opens next, where I'll sign in, approve, and set a quota; if the browser can't open, give me the link as described above. Start sign-in at most once.
4. After approval, call hiapi's get_balance to confirm it works; if the call fails, you may retry once, and if it fails again, stop and show me the exact error. Don't call any tool that costs money (image, video, audio, or text generation). If this session can't see hiapi's tools yet, ask me to restart it instead of signing in again.
5. Keep other entries when editing config files, and never print access tokens, authorization codes, code_verifier, or other credentials in chat, logs, or command echo.
6. When done, report briefly in two parts. What you verified yourself: which config you changed (a file or an in-app setting; say so if it was already there and left alone), and the balance check result with the balance. What I need to confirm: whether I approved in the browser, and whether I need to restart the client.

If what you find differs only slightly from these steps (for example the config file doesn't exist yet, or an existing entry is formatted a little differently), go with what's actually there and point out each deviation in your report. If a screen or setting isn't there, a command doesn't exist, you aren't the client named above, or a change outside these steps would be needed, stop and tell me what you see instead of guessing another way.
Report only what you actually did and saw. For my side (for example, whether I approved in the browser), if you can't see it, write "waiting for you to confirm" instead of calling it done.
Manual setup
Prefer to edit it yourself? Copy the commands or file contents below.
https://mcp.hiapi.ai/mcp{"mcpServers":{"hiapi":{"url":"https://mcp.hiapi.ai/mcp"}}}/mcp-config login hiapiSend this prompt to DeepSeek Harness
Paste it into the chat inside this client; it configures the connection and starts the authorization for you.
- 1 Click "Copy prompt"
- 2 Paste it into DeepSeek Harness and send
- 3 Your browser opens HiAPI's approval page: sign in, pick a quota and approve
Please connect HiAPI MCP to DeepSeek Harness (DSH) in the environment I actually use.

Target client: DeepSeek Harness (not Claude Code / Cursor / VS Code)
Server name: hiapi
MCP URL: https://mcp.hiapi.ai/mcp

I'll do only two things myself — don't ask me to do anything else (no typing commands, editing files, or handling callback URLs):
① send you my HiAPI API Key; ② restart DSH once.

First note one premise, and don't follow a generic MCP tutorial:
DSH's MCP client (@deepseek-ai/dsh-mcp-client) supports only Streamable HTTP with static request headers.
It has no OAuth (no authorization server discovery, dynamic client registration, PKCE, or token refresh).
So HiAPI's OAuth sign-in can't work in DSH; you must use a static
"Authorization: Bearer <HiAPI API Key>" header. The HiAPI server supports both, so this isn't a server problem.

Do these in order:
1. Locate the DSH environment: read $DSH_HOME (default ~/.dsh), list the profile directories under profiles,
   and find the one in use (desktop is usually called desktop; the CLI may use web or tui).
   Confirm ~/.dsh/profiles/<profile>/cordis.patch.yml exists. If you can't find it, stop and show me the directory structure you see.
2. Make sure the plugin is available: check that @deepseek-ai/dsh-mcp-client exists under node_modules in the DSH install directory.
   If the profile can't resolve it, install it into the profile with `dsh plugin --profile <profile> add @deepseek-ai/dsh-mcp-client`
   (you may run this one for me).
3. Ask me for my HiAPI API Key (I'll copy it from the HiAPI console). Once you have it, never echo the key in chat,
   logs, or command output, and don't write it into cordis.patch.yml.
4. Write the key into DSH's environment layer file ~/.dsh/.env: append the line "HIAPI_API_KEY=...",
   keep everything else in the file, and create the file if it doesn't exist.
   Note: a key saved in the DSH settings UI lives in the credential store and never reaches process.env, so it must go through .env.
5. Edit ~/.dsh/profiles/<profile>/cordis.patch.yml: back up the original first, then [append one insert entry].
   Don't write a plain "- id: xxx" line — that form modifies an existing entry,
   and when the target id doesn't exist it is silently skipped (only an "entry not found" line on stderr), so the plugin never loads.
   Write it in this form:
   - insert:
       - id: mcp-hiapi
         name: '@deepseek-ai/dsh-mcp-client'
         config:
           serverName: hiapi
           transport: streamable-http
           url: https://mcp.hiapi.ai/mcp
           headers:
             Authorization: !!js "`Bearer ${process.env.HIAPI_API_KEY}`"
6. Leave every other entry in the patch file as it is, and don't change bundles.
7. When done, tell me which two files you changed and why a restart is needed (the environment layer is frozen at startup).
   Then ask me to restart DSH.
8. After the restart, verify: confirm tools starting with mcp__hiapi__ appear, then call only get_balance to confirm the connection.
   Don't call generate_image / generate_video / generate_audio / generate_text or any other tool that costs money.
9. If the tools still don't appear after the restart, check these in order and show me the exact error — don't retry by trial and error or keep changing the config:
   ① the variable name in ~/.dsh/.env is exactly HIAPI_API_KEY;
   ② the patch uses the insert form;
   ③ the terminal output from starting DSH has a warn/error from mcp-client(hiapi).
10. Report only what you actually did and saw. Copy the balance and tool names from the real output;
    write "to be confirmed" for anything you didn't verify, never a guess or "should have worked".

If what you find doesn't match these steps (no profile directory, a different patch format, no dsh command,
or the client isn't DSH), stop and tell me what you see instead of guessing another way.
Manual setup
Prefer to edit it yourself? Copy the commands or file contents below.
https://mcp.hiapi.ai/mcp~/.dsh/.env (Windows: C:\Users\<user>\.dsh\.env) HIAPI_API_KEY=<your HiAPI API Key>~/.dsh/profiles/<profile>/cordis.patch.yml - insert:
- id: mcp-hiapi
name: '@deepseek-ai/dsh-mcp-client'
config:
serverName: hiapi
transport: streamable-http
url: https://mcp.hiapi.ai/mcp
headers:
Authorization: !!js "`Bearer ${process.env.HIAPI_API_KEY}`"Send this prompt to WorkBuddy
Paste it into the chat inside this client; it configures the connection and starts the authorization for you.
- 1 Click "Copy prompt"
- 2 Paste it into WorkBuddy and send
- 3 Your browser opens HiAPI's approval page: sign in, pick a quota and approve
Please connect HiAPI MCP in the environment I actually use. Call out every step I have to do myself (clicking a button in the client, approving in the browser) — that's all I'll do; don't ask me to paste commands, codes, or callback URLs.

Target client: WorkBuddy
Server name: hiapi
MCP URL: https://mcp.hiapi.ai/mcp (Streamable HTTP + OAuth)

Do these in order:
1. Confirm you are WorkBuddy and state the environment evidence you relied on (for example the platform, or the WorkBuddy Connectors / MCP service management screens you can see) — a self-declaration isn't enough. Work only inside WorkBuddy's own UI and settings; don't touch other clients' configs.
2. Check WorkBuddy's own MCP management for "hiapi": keep it if the URL matches, don't add it twice. Add it through WorkBuddy's own MCP management too: Connectors → MCP service management → Configure MCP, name it "hiapi", paste the MCP URL above, choose HTTP transport and OAuth authentication. Don't switch to `codebuddy mcp add` or ~/.codebuddy/.mcp.json: Tencent's official MCP doc (cloud.tencent.com/document/product/1831/137039) documents the CodeBuddy CLI and never says WorkBuddy desktop reads that file; the official docs also don't say where the desktop config lives, so don't guess paths — only add it through WorkBuddy's own UI or documented steps.
3. After saving, ask me to open Connectors → MCP service management in WorkBuddy, find "hiapi", click Trust first, then Connect. If "hiapi" isn't listed, remind me to fully quit and restart WorkBuddy; if Connect doesn't open a browser, remind me to set Chrome as the default browser. Clicking Connect opens the HiAPI approval page in my browser, where I'll sign in, approve, and set a quota; if it doesn't open, check the step above. Start sign-in at most once.
4. After approval, call hiapi's get_balance to confirm it works; if the call fails, you may retry once, and if it fails again, stop and show me the exact error. Don't call any tool that costs money (image, video, audio, or text generation). If this session can't see hiapi's tools yet, ask me to restart it instead of signing in again.
5. Keep other entries when editing config files, and never print access tokens, authorization codes, code_verifier, or other credentials in chat, logs, or command echo.
6. When done, report briefly in two parts. What you verified yourself: which config you changed (a file or an in-app setting; say so if it was already there and left alone), and the balance check result with the balance. What I need to confirm: whether I approved in the browser, and whether I need to restart the client.

If what you find differs only slightly from these steps (for example the config file doesn't exist yet, or an existing entry is formatted a little differently), go with what's actually there and point out each deviation in your report. If a screen or setting isn't there, a command doesn't exist, you aren't the client named above, or a change outside these steps would be needed, stop and tell me what you see instead of guessing another way.
Report only what you actually did and saw. For my side (for example, whether I approved in the browser), if you can't see it, write "waiting for you to confirm" instead of calling it done.
Manual setup
Prefer to edit it yourself? Copy the commands or file contents below.
https://mcp.hiapi.ai/mcpConnectors → MCP service management → Configure MCP (hiapi / HTTP / OAuth)Trust → ConnectSend this prompt to ZCode
Paste it into the chat inside this client; it configures the connection and starts the authorization for you.
- 1 Click "Copy prompt"
- 2 Paste it into ZCode and send
- 3 Your browser opens HiAPI's approval page: sign in, pick a quota and approve
Please connect HiAPI MCP in the environment I actually use. Call out every step I have to do myself (clicking a button in the client, approving in the browser) — that's all I'll do; don't ask me to paste commands, codes, or callback URLs.

Target client: ZCode
Server name: hiapi
MCP URL: https://mcp.hiapi.ai/mcp (Streamable HTTP + OAuth)

Do these in order:
1. Confirm you are ZCode and state the environment evidence you relied on (the platform, whether ~/.zcode exists, and whether the built-in zcode-guide plugin is available) — a self-declaration isn't enough. Do all the setup below in the environment you actually run in (macOS / Linux / Windows / WSL, local or remote server).
2. Read ZCode's user-level config ~/.zcode/cli/config.json. If the file doesn't exist, create it with only { "mcp": { "servers": { "hiapi": { "type": "http", "url": "https://mcp.hiapi.ai/mcp" } } } }. If it exists but isn't valid JSON, stop and tell me the error; don't overwrite it. If mcp.servers already has "hiapi" with the same URL, keep it and don't add it twice; otherwise add "hiapi": { "type": "http", "url": "https://mcp.hiapi.ai/mcp" } under mcp.servers and leave every other entry as it is. The schema comes from the diagnosing-mcp skill in ZCode's built-in zcode-guide plugin: it is strict, and one unknown key makes ZCode silently drop the whole server, so write only type and url. Don't add auth, oauth, bearerToken or similar fields, and don't copy another client's format (for example ~/.config/mcp/mcp.json); ZCode manages the OAuth sign-in itself. Don't write ~/.agents/mcp.json: when .zcode has any servers, that file is skipped entirely.
3. Ask me to open ZCode Settings → MCP servers, find "hiapi", and click Open authorization. The Settings page reads the config only once while ZCode runs, so if "hiapi" isn't listed, first remind me to fully quit and restart ZCode. If the status doesn't refresh after approval, remind me to restart ZCode once more. Clicking Open authorization opens the HiAPI page in my system browser, where I'll sign in, approve, and set a quota. Don't start sign-in repeatedly yourself; if it fails, tell me the error and let me decide whether to try again.
4. After approval, call hiapi's get_balance to confirm it works; if the call fails, you may retry once, and if it fails again, stop and show me the exact error. Don't call any tool that costs money (image, video, audio, or text generation). If this session can't see hiapi's tools yet, ask me to restart it instead of signing in again.
5. Keep other entries when editing config files, and never print access tokens, authorization codes, code_verifier, or other credentials in chat, logs, or command echo.
6. When done, report briefly in two parts. What you verified yourself: which config you changed (a file or an in-app setting; say so if it was already there and left alone), and the balance check result with the balance. What I need to confirm: whether I approved in the browser, and whether I need to restart the client.

If what you find differs only slightly from these steps (for example the config file doesn't exist yet, or an existing entry is formatted a little differently), go with what's actually there and point out each deviation in your report. If a screen or setting isn't there, a command doesn't exist, you aren't the client named above, or a change outside these steps would be needed, stop and tell me what you see instead of guessing another way.
Report only what you actually did and saw. For my side (for example, whether I approved in the browser), if you can't see it, write "waiting for you to confirm" instead of calling it done.
Manual setup
Prefer to edit it yourself? Copy the commands or file contents below.
https://mcp.hiapi.ai/mcp"mcp": { "servers": { "hiapi": { "type": "http", "url": "https://mcp.hiapi.ai/mcp" } } }Settings → MCP servers → Open authorizationSend this prompt to Grok Bot
Paste it into the chat inside this client; it configures the connection and starts the authorization for you.
- 1 Click "Copy prompt"
- 2 Paste it into Grok Bot and send
- 3 Your browser opens HiAPI's approval page: sign in, pick a quota and approve
Please connect HiAPI MCP in the environment I actually use. Call out every step I have to do myself (clicking a button in the client, approving in the browser) — that's all I'll do; don't ask me to paste commands, codes, or callback URLs.

Target client: Grok Bot
Server name: hiapi
MCP URL: https://mcp.hiapi.ai/mcp (Streamable HTTP + OAuth)

Do these in order:
1. First confirm you're running in Grok Bot and state the evidence you relied on (for example the Grok page you're on and whether you have computer-use) — a self-declaration isn't enough. This connector lives on the Grok account — it's account-level, not a local file. Don't run `grok mcp add` from Grok Build / TUI, and don't write any local mcp.json or machine-level MCP config.
2. Check Settings → Plugins → Yours for "hiapi". If it's missing and you have computer-use, open https://grok.com/connectors on your own cloud computer, go to New Connector → Custom, name it "hiapi", and enter the public HTTPS MCP URL above. Only navigate and fill fields — stop before Add, Save, Connect, or any button that starts authorization, and let me click it myself. Without computer-use, ask me to open that page. Don't assume Grok supports dynamic client registration or PKCE: if the form demands a client_id / client_secret, or the connector is disabled by a team admin, stop and tell me — don't guess and don't fall back to a fixed secret.
3. If "hiapi" already exists but isn't authenticated or has expired, open its details in Settings → Plugins → Yours and find Authenticate / Reauthorize — pause before triggering it and let me confirm. If it's already connected, don't create or re-authorize it again. Sign-in, passwords, 2FA, CAPTCHAs, and the final approval are mine to do; wait for me if I'm away. After I approve, return to Grok Bot and keep checking; don't re-authorize just because Grok didn't auto-callback. At most one OAuth this time.
4. After approval, call hiapi's get_balance to confirm it works; if the call fails, you may retry once, and if it fails again, stop and show me the exact error. Don't call any tool that costs money (image, video, audio, or text generation). If this session can't see hiapi's tools yet, ask me to restart it instead of signing in again.
5. Do everything on the Grok account pages and don't modify local config files. Never expose access_token, refresh_token, authorization codes, code_verifier, client_secret, cookies, or state in chat, logs, screenshots, or form fields.
6. When done, report briefly in two parts. What you verified yourself: the connector status you saw in Settings → Plugins → Yours, whether tools are enabled, and the balance check result with the balance. What I need to confirm or take over: whether I finished the final approval on my side, and which buttons I have to click myself.

If what you find differs only slightly from these steps (for example the config file doesn't exist yet, or an existing entry is formatted a little differently), go with what's actually there and point out each deviation in your report. If a screen or setting isn't there, a command doesn't exist, you aren't the client named above, or a change outside these steps would be needed, stop and tell me what you see instead of guessing another way.
Report only what you actually did and saw. For my side (for example, whether I approved in the browser), if you can't see it, write "waiting for you to confirm" instead of calling it done.
Manual setup
Prefer to edit it yourself? Copy the commands or file contents below.
https://mcp.hiapi.ai/mcphttps://grok.com/connectors → New Connector → CustomSettings → Plugins → YoursAdd HiAPI in Doubao
-
Step 1
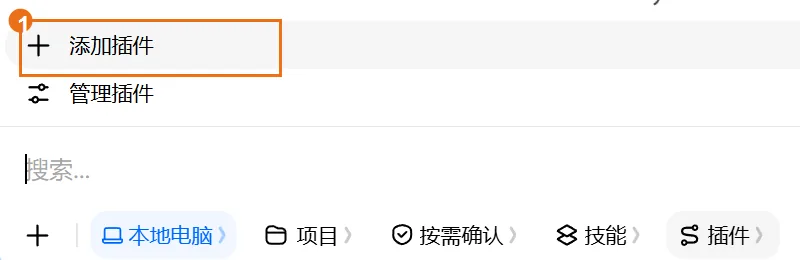
In Doubao desktop, under the message box choose ① Local computer → ② Plugins, then click Add plugin.

-
Step 2
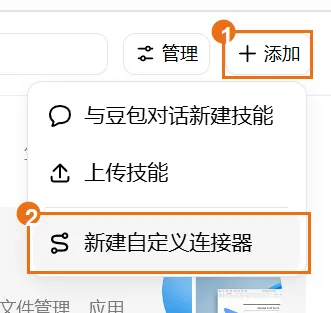
Click ① + Add at the top right and choose ② New custom connector.

-
Step 3
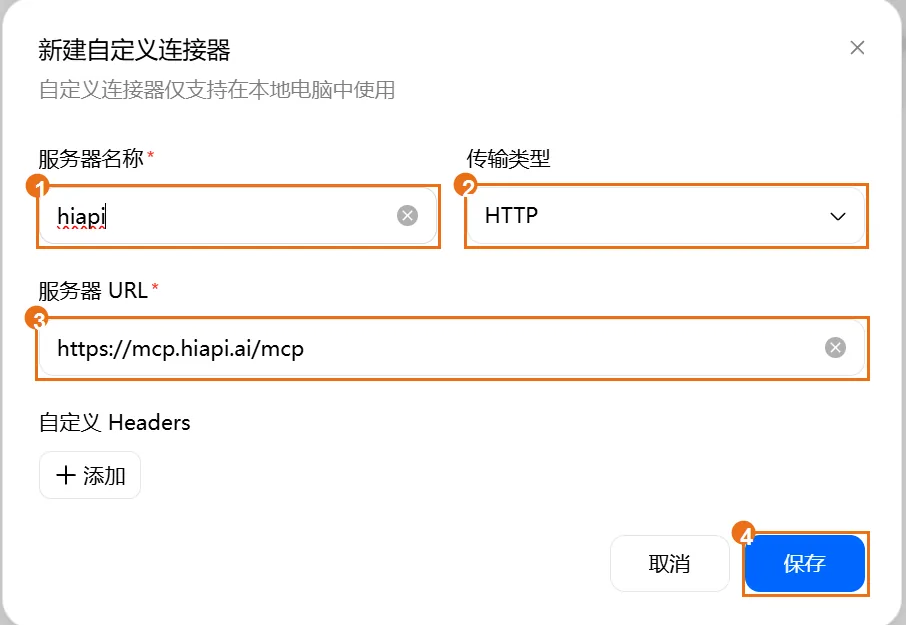
① Name it hiapi, ② choose HTTP transport, ③ paste the MCP URL above as the server URL, leave custom headers empty, and click ④ Save.
-
Step 4
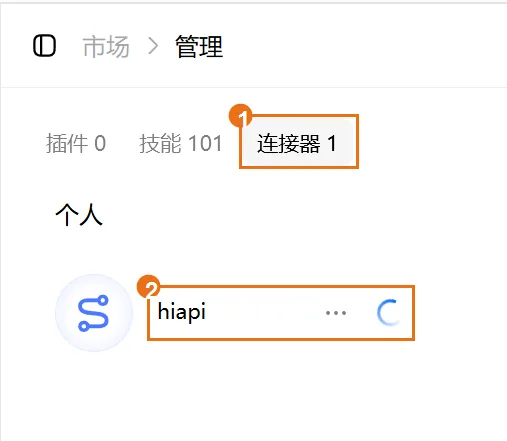
After saving, wait in Manage → Connectors until hiapi finishes loading.
-
Step 5
When you see ① Not authorized, click ② Authorize on the right.
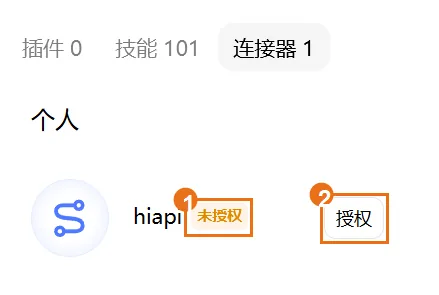
-
Step 6
In the dialog, click Go authorize. The browser opens the HiAPI approval page.
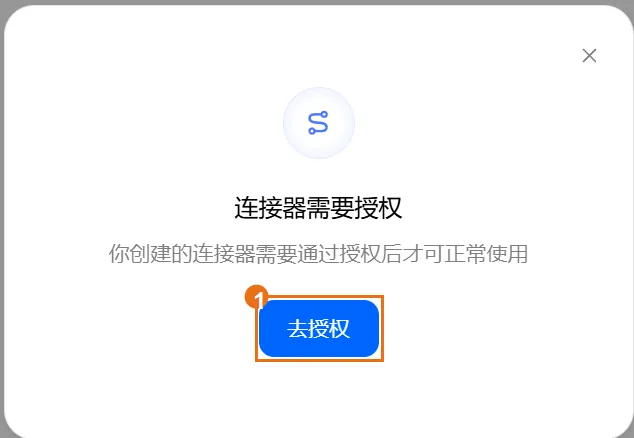
-
Step 7
Check the request is from Doubao MCP Client, ① pick a quota, then click ② Approve and create and go back to Doubao. The $50 in the screenshot is just an example; the quota is a spending cap, not free credit, and it lasts 30 days.
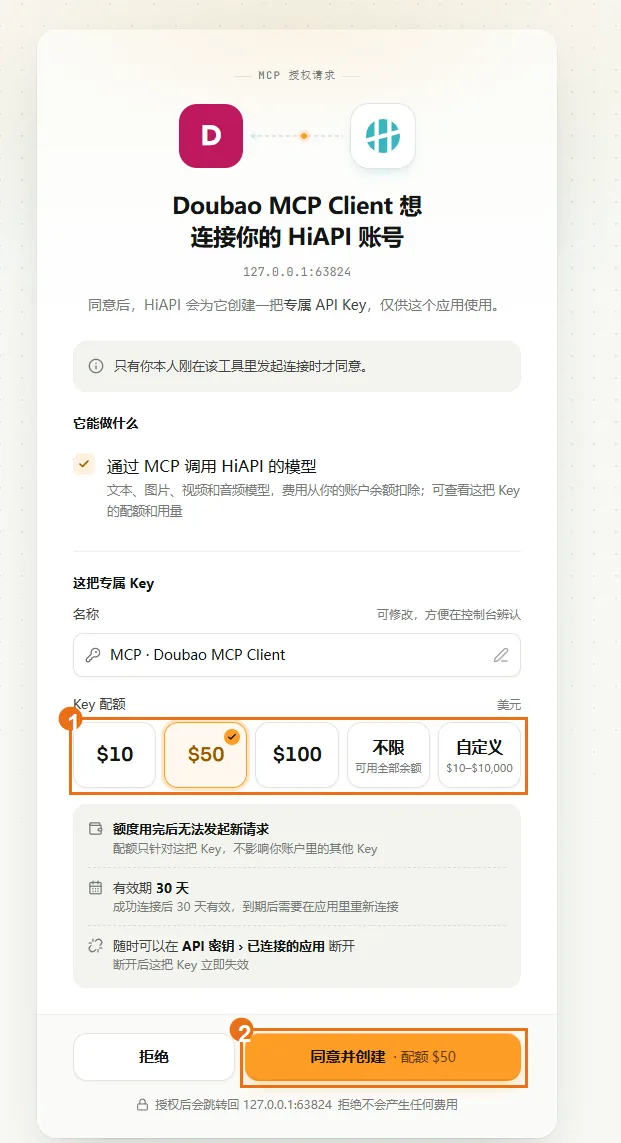
-
Step 8
① Authorized and ② a blue switch next to hiapi mean it's authorized and on.
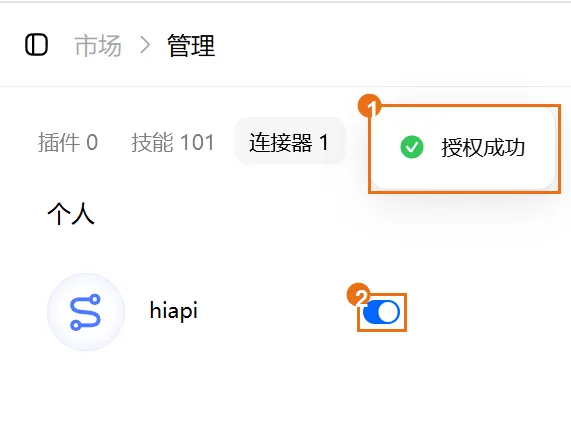
-
Step 9
Back in a chat, send “Call HiAPI's get_balance to check the connection. Return only the tool result; don't generate or upload anything.” It's connected once you see a real tool call and your balance.
Add HiAPI in ChatGPT web
-
Step 1
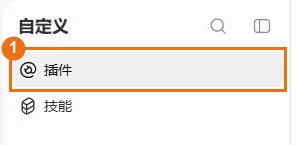
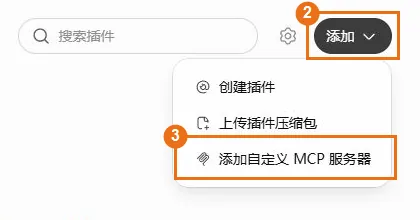
In ChatGPT on the web, click ① Plugins in the left sidebar (or open chatgpt.com/plugins), then ② Add → ③ Add custom MCP server at the top right.
-
Step 2
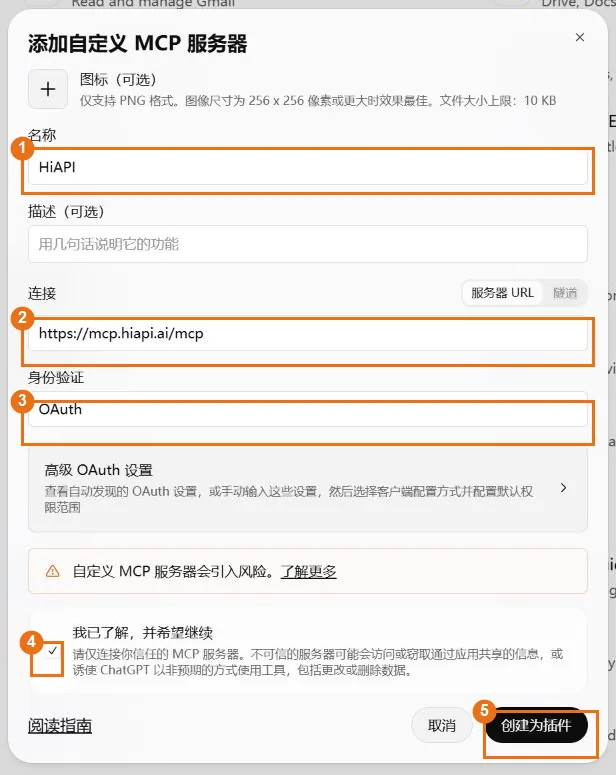
① Name it HiAPI, ② paste the MCP URL above as the server URL, ③ choose OAuth for authentication, and leave the rest as is. After reading the risk notice, ④ tick “I understand and want to continue” and click ⑤ Create as plugin.
-
Step 3
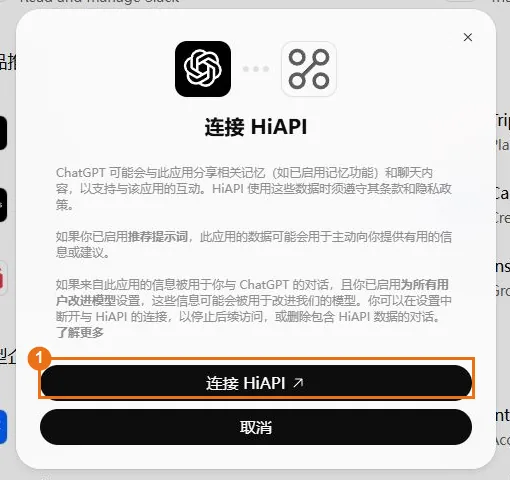
Click Connect HiAPI to open the HiAPI approval page.
-
Step 4
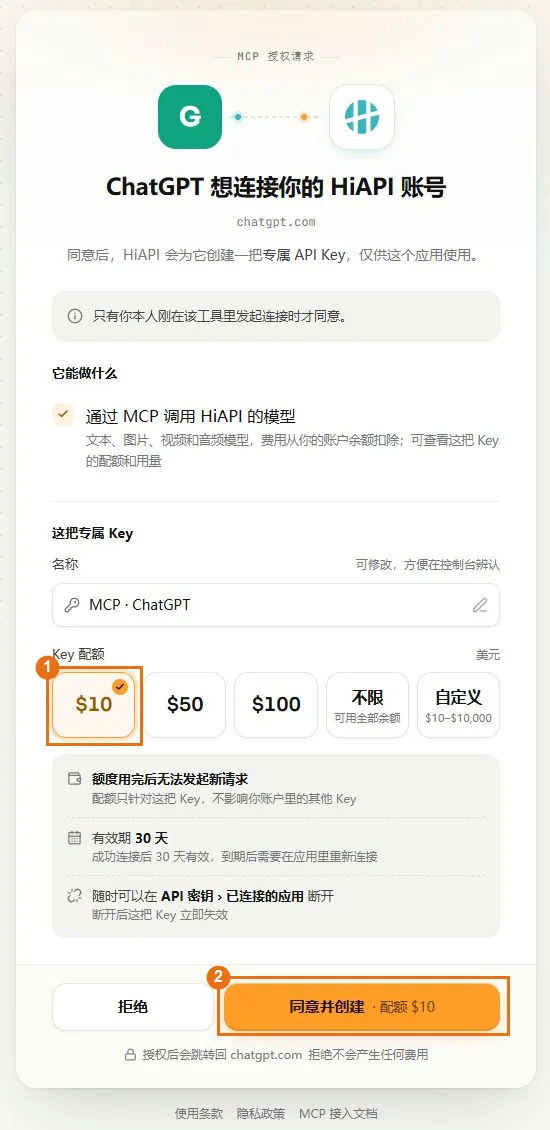
Check it's your HiAPI account, ① pick a quota, then click ② Approve and create and go back to ChatGPT. The $10 in the screenshot is just an example; the quota is a spending cap for this connection, not free credit, and it lasts 30 days.
-
Step 5
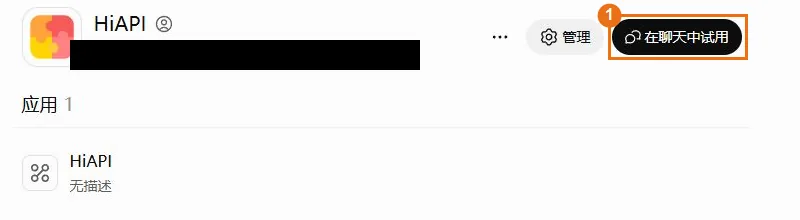
Open the HiAPI plugin and click Try in chat. If it still says Install, install it first. If it lands in work mode with Send disabled, switch back to chat.
-
Step 6
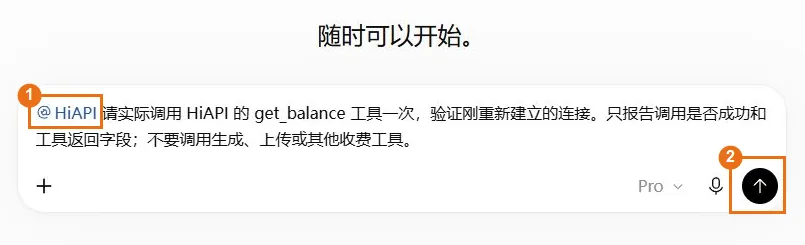
Make sure the message box shows the ① HiAPI tag, paste this, and click ② Send: “Call HiAPI's get_balance to check the connection. Return only the tool result; don't generate or upload anything.”
-
Step 7
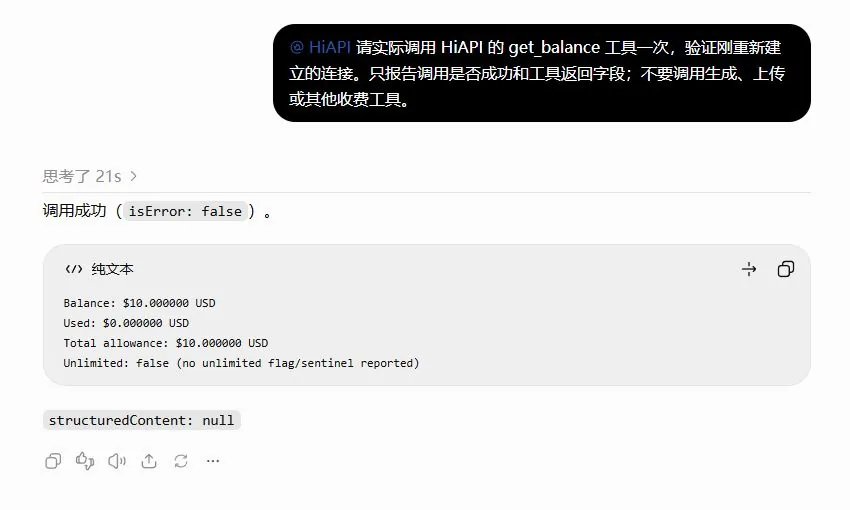
When you see a successful call (isError: false) with balance fields such as Balance and Used, you're connected. Images, videos, and other generations are billed by usage.
Add HiAPI in Claude web / desktop
-
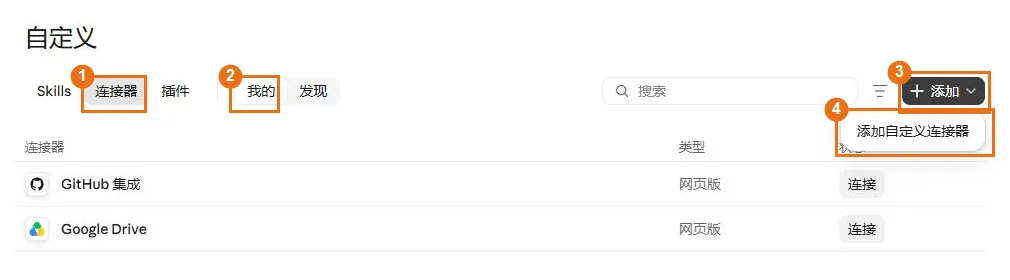
Step 1
In Claude, click Customize in the left sidebar, then ① Connectors → ② Mine → ③ Add → ④ Add custom connector.
-
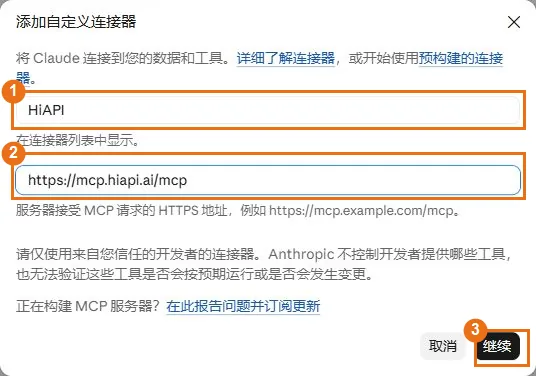
Step 2
① Name it HiAPI, ② paste the MCP URL above, click ③ Continue, and wait for the check to finish.
-
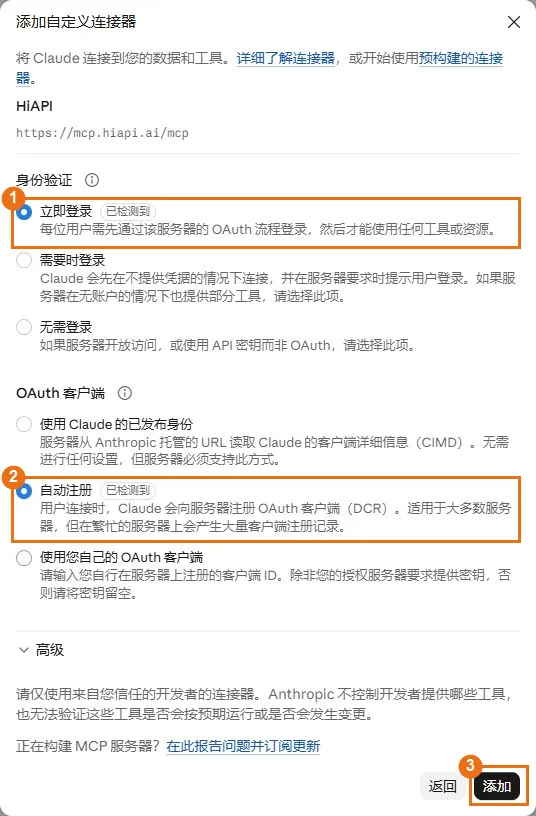
Step 3
For authentication choose ① Sign in now, for the OAuth client choose ② Automatic registration, leave the rest as is, and click ③ Add.
-
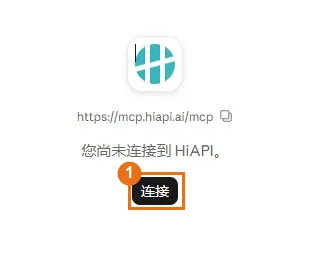
Step 4
If you see “You're not connected to HiAPI”, click Connect. If the approval page already opened, go to the next step.
-
Step 5
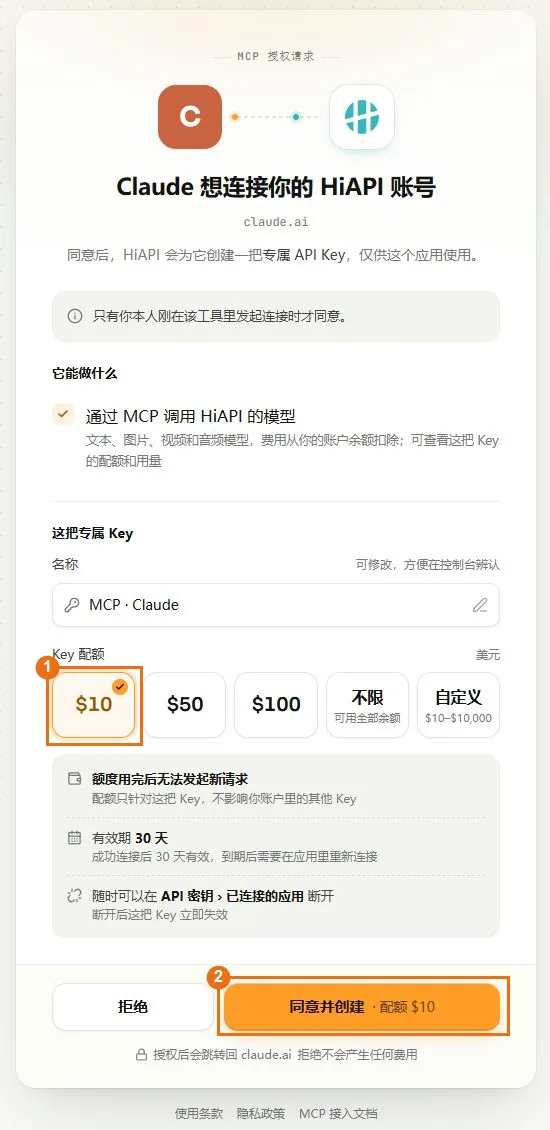
Check the account and that the request is from Claude, ① pick a quota, then click ② Approve and create. The $10 in the screenshot is just an example; the quota is a spending cap, not free credit, and it lasts 30 days.
-
Step 6
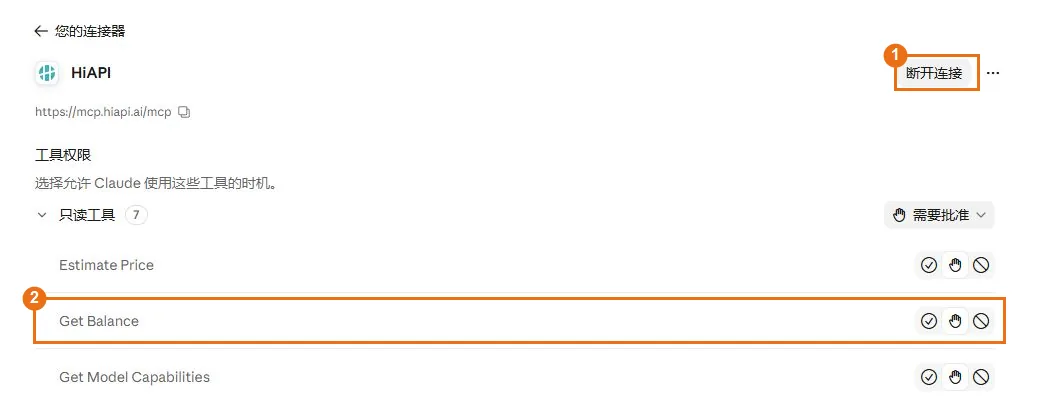
Back in Claude, ① a Disconnect button and ② tools such as Get Balance mean it's connected.
-
Step 7
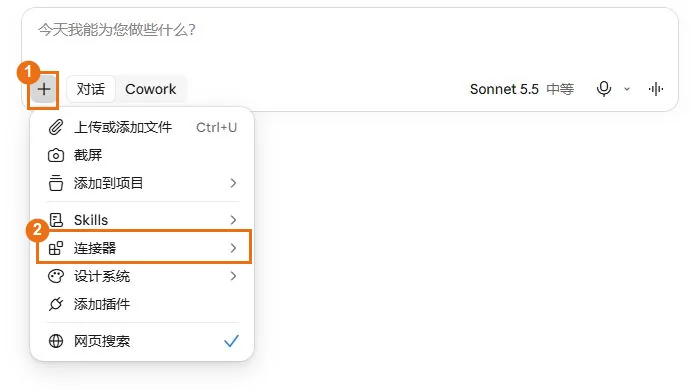
Start a regular chat and click ① + → ② Connectors at the bottom left of the message box.
-
Step 8
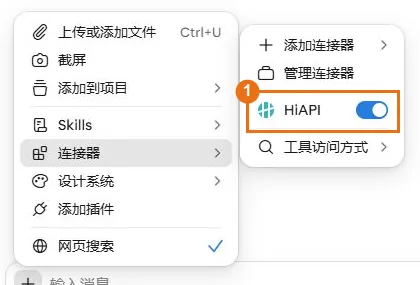
Make sure the switch next to HiAPI is blue. If it's already on, leave it.
-
Step 9
Send “Call HiAPI's get_balance to check the connection. Return only the tool result; don't generate or upload anything.” When the Get Balance approval prompt appears, click Allow once.
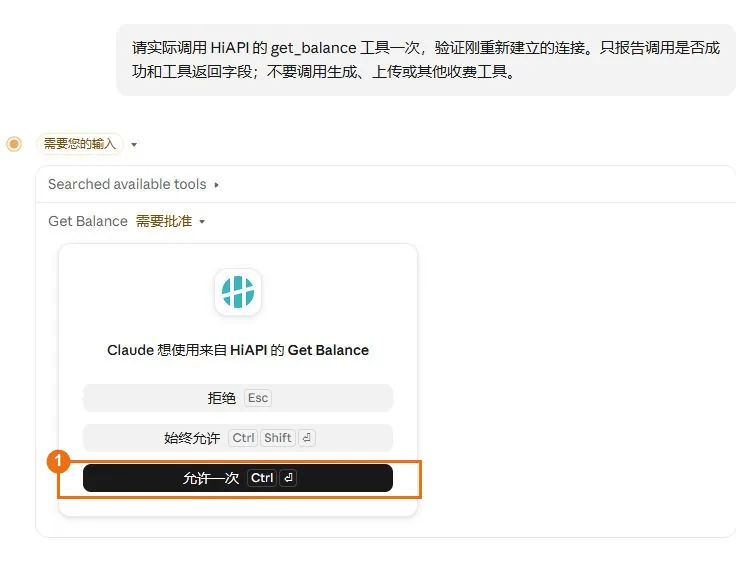
-
Step 10
Expand the tool record. Get Balance with balance fields means you're connected. Images, videos, and other generations are billed by usage.
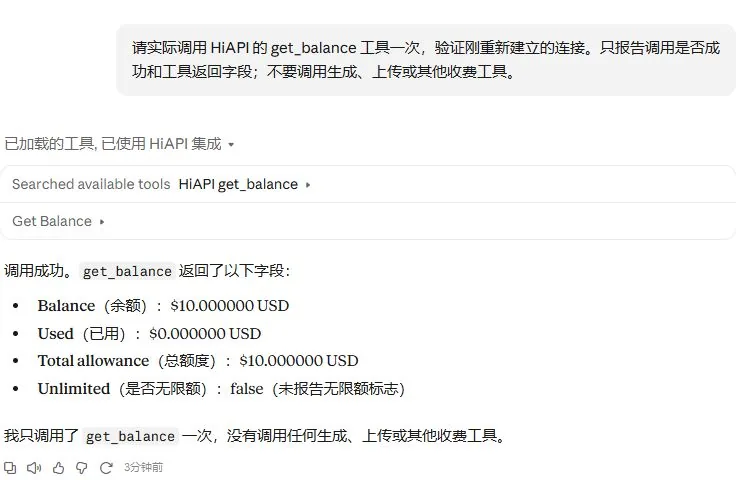
Send this prompt to Other agents
Paste it into the chat inside this client; it configures the connection and starts the authorization for you.
- 1 Click "Copy prompt"
- 2 Paste it into Other agents and send
- 3 Your browser opens HiAPI's approval page: sign in, pick a quota and approve
Please connect HiAPI MCP in the environment I actually use. Call out every step I have to do myself (clicking a button in the client, approving in the browser) — that's all I'll do; don't ask me to paste commands, codes, or callback URLs.

Target client: yourself (the current Agent)
Server name: hiapi
MCP URL: https://mcp.hiapi.ai/mcp (Streamable HTTP + OAuth)

Do these in order:
1. Confirm you are yourself (the current Agent) and state the environment evidence you relied on (the platform, and whether your own config or plugin directory exists) — a self-declaration isn't enough. Do all the setup below in the environment you actually run in (macOS / Linux / Windows / WSL, local or remote server).
2. Add it using your own remote MCP configuration: Streamable HTTP + OAuth (authorization server metadata discovery + dynamic client registration). Don't borrow other clients' commands, and don't write a fixed token, Authorization header, or client_secret. If any of this isn't supported, stop and tell me what's missing.
3. Only if it's clearly not authorized, start your own OAuth sign-in and wait for me to approve in the browser. The HiAPI approval page opens next, where I'll sign in, approve, and set a quota; if the browser can't open, give me the link as described above. Start sign-in at most once.
4. After approval, call hiapi's get_balance to confirm it works; if the call fails, you may retry once, and if it fails again, stop and show me the exact error. Don't call any tool that costs money (image, video, audio, or text generation). If this session can't see hiapi's tools yet, ask me to restart it instead of signing in again.
5. Keep other entries when editing config files, and never print access tokens, authorization codes, code_verifier, or other credentials in chat, logs, or command echo.
6. When done, report briefly in two parts. What you verified yourself: which config you changed (a file or an in-app setting; say so if it was already there and left alone), and the balance check result with the balance. What I need to confirm: whether I approved in the browser, and whether I need to restart the client.

If what you find differs only slightly from these steps (for example the config file doesn't exist yet, or an existing entry is formatted a little differently), go with what's actually there and point out each deviation in your report. If a screen or setting isn't there, a command doesn't exist, you aren't the client named above, or a change outside these steps would be needed, stop and tell me what you see instead of guessing another way.
Report only what you actually did and saw. For my side (for example, whether I approved in the browser), if you can't see it, write "waiting for you to confirm" instead of calling it done.
Manual setup
Prefer to edit it yourself? Copy the commands or file contents below.
https://mcp.hiapi.ai/mcpStreamable HTTPOAuth 2.1 + PKCE + Dynamic Client RegistrationCommon issues
- The client can't connect
- Check that the URL is https://mcp.hiapi.ai/mcp and the transport is HTTP (Streamable).
- Balance or quota errors
- Top up in the console, then try again ↗
- Results are not ready yet
- The task is still running. Ask the AI to keep checking with the same task_id instead of submitting again.