
On this page
Codex CLI
Import the configuration with CC Switch to use GPT models in Codex CLI through HiAPI, with manual configuration included.
Codex CLI can connect to HiAPI through CC Switch one-click import, or you can configure it manually (step 9). The steps below use gpt-6-astra as the example; HiAPI uses the OpenAI Responses protocol. This tutorial was verified on Mac with Codex CLI 0.162.1; the Mac steps are the main path and Windows steps are listed separately. You can skip installing software you already have.
1. Install Node.js
Install LTS 22.19 or later as described in Node.js setup, and skip it if you already have it. Then run the two commands below in a terminal; seeing version numbers is enough:
node --version
npm --version
2. Install Codex CLI
In the terminal you just opened, run each line:
npm install -g @openai/codex
codex --version
Seeing a codex-cli version number is enough; manual configuration (step 9) requires 0.134 or later. On Windows PowerShell, use npm.cmd install -g @openai/codex and codex.cmd --version.
3. Install and open CC Switch
Download, install and open CC Switch as described in CC Switch install and one-click import; if you already have it, just open it.
If you already have providers, first note the name of the card marked “In use” on the Codex page, and when needed export an SQL backup as described in Back up your current configuration.
4. Choose a HiAPI API key
Choose or create a key as described in Get an API Key and note its name. You don’t need to copy the key here; the import carries it over.
5. Prepare the one-click import on the web
-
Open the HiAPI Codex connect page and choose API Key setup → Codex → Command line → gpt-6-astra → macOS. On Windows, choose Windows as the system.
-
Click Import to CC Switch, pick the key name you noted in the API Key dropdown, and check that the bottom shows Responses API ·
https://api.hiapi.ai/v1. -
Click Prepare import, then Open CC Switch; allow it when the browser asks.
Screenshots for each step are in Prepare the import on the connect page.
6. Confirm the import in CC Switch
In the “Confirm provider import” window, check the items below, leave Switch to this provider immediately after import off, then click Import:
| Field | Expected value |
|---|---|
| App type | Codex |
| Provider name | HiAPI - gpt-6-astra |
| API endpoint | https://api.hiapi.ai/v1 |
| Model | gpt-6-astra |
| API key | Filled in and hidden |
Back on the Codex page in CC Switch, the HiAPI - gpt-6-astra card means the import worked (it is not enabled yet). See the screenshots in Confirm the import in CC Switch.
7. Enable HiAPI
- Wait for the task Codex is running to finish first. On the Codex → Direct page in CC Switch, click the Switch / Enable button on the
HiAPI - gpt-6-astracard; HiAPI is enabled only when the card is marked “In use”. See the screenshots in Enable HiAPI. - Fully quit and reopen Codex so the new configuration takes effect. CLI and Desktop may share the local Codex configuration; to switch back to your original provider later, switch to its card here and reopen the client.
8. Open Codex, choose a model and start
- Open a new terminal and go to the project folder you want to use, or create an empty one first:
mkdir -p "$HOME/hiapi-project"
cd "$HOME/hiapi-project"
codex
Windows PowerShell:
New-Item -ItemType Directory -Force "$env:USERPROFILE\hiapi-project"
Set-Location "$env:USERPROFILE\hiapi-project"
codex.cmd
-
The first time it asks whether to trust the directory, confirm the path is the folder you just chose, then confirm as prompted and keep the default permissions. With one-click import, run
codexdirectly; do not add the--profile hiapiused for manual configuration. -
In the Codex input box, type
/modeland press Enter. Use the arrow keys to choose GPT-6 Astra / gpt-6-astra and press Enter; if there is a thinking level, pick one and confirm, then press Esc to go back.
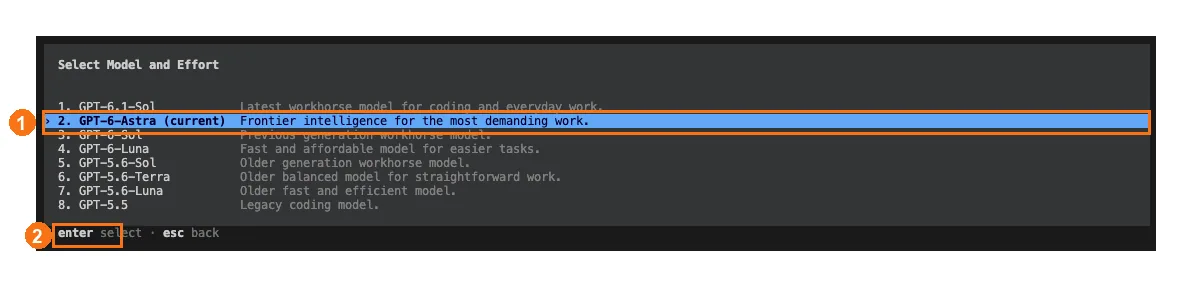
① Use the arrow keys to choose GPT-6-Astra; ② press Enter to confirm.
- Send “Hello, introduce yourself in one sentence.” A normal reply means the connection works. If Request logs in the HiAPI console shows this request, it is going through HiAPI. After that, just write what you want to get done in the input box.
9. Manual configuration (without CC Switch)
Skip this step if you used the one-click import. Manual configuration only applies to Codex CLI, not Codex Desktop.
- On a Mac, run the three lines below in a terminal; an existing file with the same name is backed up automatically first:
mkdir -p "$HOME/.codex"
if [ -f "$HOME/.codex/hiapi.config.toml" ]; then cp "$HOME/.codex/hiapi.config.toml" "$HOME/.codex/hiapi.config.toml.bak-$(date +%Y%m%d-%H%M%S)"; fi
nano "$HOME/.codex/hiapi.config.toml"
- For a new file, paste all of the content below; if the file exists, only update fields and tables with the same names, keep the rest, and don’t append duplicates. Top-level fields must come before
[model_providers.hiapi].env_key = "HIAPI_API_KEY"is how Codex reads an environment variable; leave it as is.
model_provider = "hiapi"
model = "gpt-6-astra"

[model_providers.hiapi]
name = "HiAPI"
base_url = "https://api.hiapi.ai/v1"
env_key = "HIAPI_API_KEY"
requires_openai_auth = false
wire_api = "responses"
-
Press Ctrl+O → Enter → Ctrl+X to save and exit. The file name must be
hiapi.config.toml, not.toml.txt. If you have setCODEX_HOME, save the file in that directory. -
Go back to HiAPI Console → API Keys, click the copy icon next to the key, and copy the full HiAPI API key. In the same terminal where you will start Codex, run the command below (replace
YOUR_HIAPI_API_KEYwith your HiAPI API key and keep the quotes), then go to your project directory and start:
export HIAPI_API_KEY="YOUR_HIAPI_API_KEY"
codex --profile hiapi
- On Windows, use PowerShell to create the
$env:USERPROFILE\.codexdirectory, openhiapi.config.tomlin Notepad and paste the same TOML; back up an existing file first. In Save as, choose “All files” and UTF-8, and confirm there is no.txtsuffix. In the same PowerShell window and project directory, run:
$env:HIAPI_API_KEY="YOUR_HIAPI_API_KEY"
codex.cmd --profile hiapi
The environment variable only applies to the current terminal; set it again after closing the terminal. Once started, choose a model as in step 8.
Troubleshooting
Only issues specific to Codex CLI are listed here. For common errors such as 401, 404 and 429, see Common errors.
| Symptom | Cause | Fix |
|---|---|---|
| Still asks you to sign in to ChatGPT after starting, or still uses the original provider | The HiAPI card is not enabled, or Codex was not fully quit and reopened | On the Codex page in CC Switch, confirm the HiAPI card is marked “In use”, then fully quit and reopen Codex |
gpt-6-astra is not in /model | You are not using the HiAPI provider | Same as above: confirm HiAPI is enabled first |
Manual configuration: --profile hiapi reports that the config cannot be found | The file name or location is wrong | The file must be named hiapi.config.toml and live in ~/.codex (or the directory you set in CODEX_HOME); make sure there is no .txt suffix |
| Manual configuration: 401 | The terminal that starts Codex has not set HIAPI_API_KEY | Set the environment variable in the same terminal before starting; set it again after closing the terminal |