
On this page
Codex Desktop
Use the graphical interface throughout and import the configuration with CC Switch to use GPT models in Codex Desktop through HiAPI.
Codex Desktop can connect to HiAPI through CC Switch one-click import. The steps below use gpt-6-astra as the example; HiAPI uses the OpenAI Responses protocol. Everything is done in the graphical interface — no Node.js install, no commands, no config file editing.
1. Install Codex Desktop
-
Open the official OpenAI desktop getting-started page and choose the Desktop app download entry. On a Mac, use the official Codex.dmg; the system and chip requirements on the official page apply.
-
Open Finder → Downloads, double-click the
.dmgand drag the app into Applications. After copying, open it from Applications; when the system asks, check that it comes from the official source and click Open. -
If the first launch stops on the sign-in page, stay there and continue installing CC Switch, importing and enabling HiAPI. You don’t need to sign in to ChatGPT once and then sign out.
Windows: choose the Windows installer on the official page, finish the installer and open the app from the Start menu; don’t use the Mac DMG.
2. Install and open CC Switch
Download, install and open CC Switch as described in CC Switch install and one-click import; if you already have it, just open it.
If you already have providers, first note the name of the card marked “In use” on the Codex page, and when needed export an SQL backup as described in Back up your current configuration.
3. Choose a HiAPI API key
Choose or create a key as described in Get an API Key and note its name. You don’t need to copy the key here; the import carries it over.
4. Prepare the one-click import on the web
- Open the HiAPI Codex connect page and choose API Key setup → Codex → Desktop → gpt-6-astra → macOS. On Windows, choose Windows as the system.
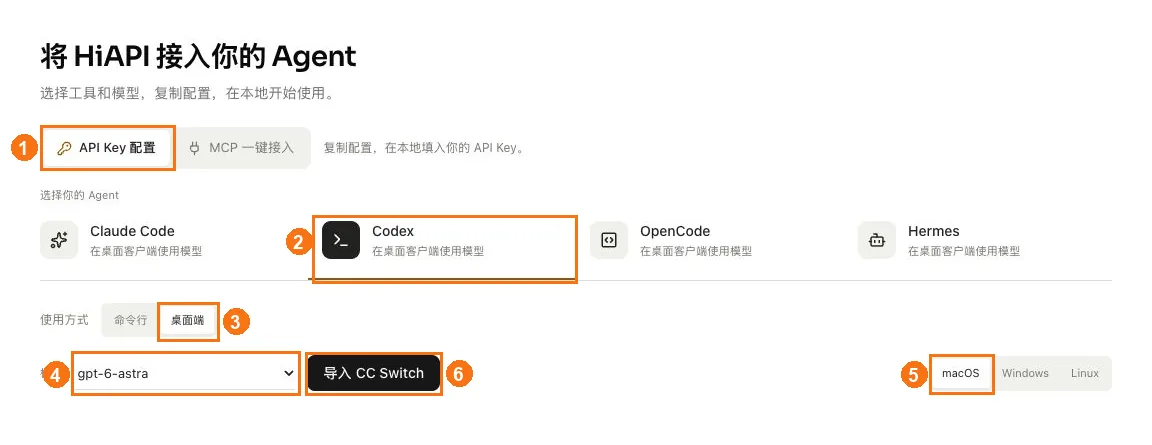
① Choose API Key setup; ② choose Codex; ③ choose Desktop; ④ choose gpt-6-astra; ⑤ choose macOS as the system (choose Windows instead on Windows); ⑥ click Import to CC Switch.
- Click Import to CC Switch, pick the key name you noted in the API Key dropdown, and check that the bottom shows Responses API ·
https://api.hiapi.ai/v1. - Click Prepare import, then Open CC Switch; allow it when the browser asks.
Screenshots for each step are in Prepare the import on the connect page.
5. Confirm the import in CC Switch
In the “Confirm provider import” window, check the items below, leave Switch to this provider immediately after import off, then click Import:
| Field | Expected value |
|---|---|
| App type | Codex |
| Provider name | HiAPI - gpt-6-astra |
| API endpoint | https://api.hiapi.ai/v1 |
| Model | gpt-6-astra |
| API key | Filled in and hidden |
Back on the Codex page in CC Switch, the HiAPI - gpt-6-astra card means the import worked (it is not enabled yet). See the screenshots in Confirm the import in CC Switch.
6. Enable HiAPI
- Wait for the task Codex is running to finish first. On the Codex → Direct page in CC Switch, click the Switch / Enable button on the
HiAPI - gpt-6-astracard; HiAPI is enabled only when the card is marked “In use”. See the screenshots in Enable HiAPI. - Fully quit and reopen Codex so the new configuration takes effect. CLI and Desktop may share the local Codex configuration; to switch back to your original provider later, switch to its card here and reopen the client.
7. Reopen the client and sign in if needed
-
Wait for any running task to finish, then on a Mac click Quit in the app menu or press
⌘Q, and open the app again from Applications. Closing the window alone does not quit it; on Windows, also quit from the app menu and open it again from the Start menu. -
If it goes straight to the main interface, continue with the next step. If an API key sign-in entry appears, click Sign in another way, then go to HiAPI Console → API Keys, find the key you chose earlier, click the copy icon next to it, and copy the full HiAPI API key.
-
Back in the client, paste the HiAPI API key into the API Key input field and click Continue. Don’t paste it into the chat input, and don’t copy the name or the masked display value. Wording may differ between versions; go by the API key sign-in entry, and you don’t need to edit any config file.
8. Open a local folder, choose a model and start
-
On a Mac, click Go → Home in the Finder menu, press
⌘⇧Nto create a folder namedhiapi-projectand press Enter to confirm; you can also use an existing project folder.On Windows, open your user directory in File Explorer, right-click an empty area, choose New → Folder and name it
hiapi-project. -
In the client, click New chat / New task, enter Codex and choose the Local work mode. Click Open / Add folder; in the Mac file picker you can press
⌘⇧G, type~/hiapi-project, press Enter and click Open / Select folder; on Windows, select the folder you just created. -
Start a new chat in this folder, open the model picker next to the input box and choose GPT-6 Astra / gpt-6-astra. Different versions may put Codex in a product menu or in a separate project area; as long as the mode is local and the folder and model are right, you’re fine.
-
Keep the default ask-before-running permissions. Send “Hello, introduce yourself in one sentence.” A normal reply means the connection works. If Request logs in the HiAPI console shows this request, it is going through HiAPI. After that, just write the task you want to get done.
Troubleshooting
Only issues specific to Codex Desktop are listed here. For common errors such as 401, 404 and 429, see Common errors.
| Symptom | Cause | Fix |
|---|---|---|
| Still on the ChatGPT sign-in page after reopening | The desktop app requires API key sign-in | Click Sign in another way and paste the HiAPI API key, see step 7 |
gpt-6-astra is missing from the model picker | The HiAPI card is not enabled, or the client was not fully quit | On the Codex page in CC Switch, confirm the HiAPI card is marked “In use”, then press ⌘Q to fully quit and reopen |
| The command-line Codex changed as well | Both share the local Codex configuration | This is expected; to switch back to your original provider, switch to its card in CC Switch |